iPASS Scheduling Steps – Checklist
NOTE: The order of the Steps is important!
Step 1. Define the Next Academic Year (District)…….…………..Page 6
Step 2. Assign Students To Next Year’s School (ALL Schools).Page 7
Step 3. Define Academic Year Schedule Parameters…………….Page 10
Step 4. Rollover the Course Catalog…………..…………….………...Page 12
Step 5. Define/Modify your Rotation………………….…………..….Page 14
Step 6. Create New Courses & Move to Course Catalog…..…….Page 15
Step 7. Student Course Requests…………………..…………………..Page 17
Step 7A. Enter Course Requests for Individual Students…..…..Page 17
Step 7B. Mass Load Student Course Requests………………..…...Page 20
Step 8. Print Reports to Verify Request Data…….…………..…….Page 25
Step 9. Edit the Course Catalog Details………………………….……Page 27
Step 10. Define Teacher & Room Assignments…………..………..Page 35
Step 11. Create Master Schedule……………………………..…………Page 35
Using the Master Schedule Builder (MSB)
Step 11A. Define MSB Parameters………………….………………….Page 35
Step 11B. Run Master Scheduler Builder……….……………………Page 41
Building or Modifying a Master Schedule Manually
Step 11C. Build/Adjust Master Schedule Manually…..…………..Page 46
Step 11D. Run Student Scheduler…………………………….………..Page 52
Step 12. Analyze Results & Modify Master Schedule……….……Page 56
Step 13. Modify Student Schedules………………………………..…..Page 58
Step 14. Scheduling Variations -
Linking, Cycles/Clusters.…..………………………Page 59
Step 15. Study Halls…………………………………………………….…..Page 62
Step 16. Middle School & Elementary School Scheduling..…....Page 64
Step 17. Print Reports………………………………………….…………..Page 65
Step 18. Career/Technical Education Schedules……………..……Page 66
Keep in mind!
GIGO
Garbage In = Garbage Out – Check your data!
It’s your data!
Is it being Backed Up regularly?
Have you defined Security access to protect it?
Menus are definable at the District level and may vary from those indicated this documentation.
i PASS is District-based and some changes may affect more than one school.
i PASS is browser-based. Screens need to be refreshed in order to see changes to data.
Are your Users Logging Out when away from their workstation?
SCHEDULING OVERVIEW
The success of any scheduler will always be dependent upon the data which has been entered.
Garbage In = Garbage Out – Check your data!
i PASS has been designed to provide you with the tools (programs and reports) necessary to help you build your Master Schedule and schedule your students to give you the best possible results. Information Marketing Group's (IMG) goal is to provide quality software, quality customer service and quality support to make your scheduling task as painless and productive as possible.
GOALS:
The goals of this document are:
Þ To provide step-by-step instructions for the entire scheduling process using i PASS ..(Pupil Administrative Software System);
Þ To provide Helpful Hints to make your scheduling task easier and more successful.
Your goals as the person responsible for Scheduling should be:
Þ To schedule each student into their requested courses; since this goal can never be achieved, you must try to schedule as many students as possible into as many of their requested courses as possible. You should also try to achieve a BALANCED Master Schedule and meet as many of your scheduling constraints as possible;
Þ To try to keep everyone happy - the Principal, Guidance, Department Heads, Teachers, Students, Unions, etc. (including yourself) by producing a final result which satisfies as many constraints as possible and does not take you the entire summer and/or drive you crazy;
Þ To insure a smooth opening of school;
Þ To avoid massive scheduling changes in September & January.
To reach your goals you should keep in mind the following:
Þ Involve others in the process, both at the beginning and at all stages.
Don't throw a cover over the Scheduling Board or lock it out of sight;
Þ Break down the task to the smallest possible segments.
For example: Don't try to schedule the entire school, work on the seniors first;
Þ Verify the data often and in different ways. Look at the scheduling board, print the Master Schedule using various sorts, print teacher and room schedules, review availability reports, etc.;
Þ Check for BALANCE;
Þ Find the time and space to work on the Master Schedule without the interruptions and distractions of the day;
Þ Walk away & take a break, as needed.
PREPARATION:
PRIMARY TASK:
GET READY AND GET ORGANIZED FOR THE ENTIRE SCHEDULING PROCESS WHICH IS AHEAD OF YOU.
A. Timeline – Sample Scheduling Timeline
Þ Establish a timeline for each phase of scheduling.
Þ Distribute the workload by assigning tasks to others.
Þ Keep your timeline handy and refer to it as you go through the process.
Þ Write down the actual completion dates as reference points for the next year.
Þ New Courses
Þ Titles
Þ Long Name (Report Cards and Transcripts)
Truncated on various internal reports.
Short Name
Redefining to upper & lower case
Þ Descriptions
Þ Numbering Scheme
Þ Alpha-numeric Course "Numbers"
Þ Course Level in Title/Number
C. Determine overall Parameters/Changes –
Þ Bell Schedules
Þ Rotations
Þ Double Periods
Þ Block Scheduling
Þ Linking
Þ State Requirements (990)
Þ Team Teaching
Þ Days in Cycle
Þ Study Halls
NOTE: i PASS has many tables with user-defined values. The default values in this documentation are the most common values, but may not match the values defined by your District. Also, because the Menu System can also be defined by the District, menu names may not exactly match the ones you see.
NOTE: The order of the Steps is important!
Top of the Document Close Window
Step 1. Define the Next Academic Year.
NOTE: The Calendar Years table is District-based. Additions/Modifications should be done by your i PASS District Super User, who should notify all schools when this step has been completed.
Þ Select <Attendance System> <Maintenance> <Calendar Years>.
Þ Enter the next Academic year in one of the three blank fields at the bottom of the list.
Þ Define the Year Order as the highest number not yet assigned.
Þ
Click
![]() to save your changes.
to save your changes.
The Academic Year that you entered should then be at the top of the list and the years should be in order proceeding down the list.
Top of the Document Close Window
Step 2. Assign Students to their Next Year’s School.
Þ Select <Biographical System> <Mass Update Students> to assign multiple students.
Þ Select <Biographical System> <Add/Modify Student Biographical> <Profile> to assign individual students.
NOTE: This step needs to be completed by ALL SCHOOLS, regardless of whether the Next Year’s School is their own, a scheduling school or a school that is not using i PASS scheduling.
Students can be assigned to the school they will be attending in the next school year at any time. This includes students who will remain in your school and students who will be moving-on to another school in your district.
Students who will be graduating out of your District should Not have a Next Year’s Primary School set for them. You will still be able to lookup information for these students next year by using the “Enrollment” option “All” or by changing the default Academic Year.
Once the Next Year’s Primary School value is set for the coming Academic Year, those students become available to the receiving school for scheduling or to the current school for scheduling if they are remaining in the same building.
Students who are new to your school for the coming school year may be entered in either Academic Year, but their Grade Level needs to be their current Grade Level. They will be promoted in the summer with the rest of your students. If they are entered in the current Academic Year, then they do need to have their Next Year’s Primary School set correctly.
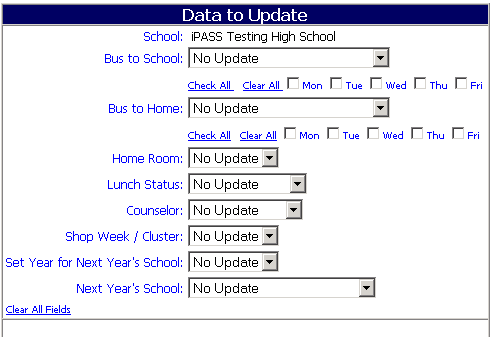
Data to Update
Set Year for Next Year’s School:
Þ Select the correct Academic Year to the coming year from the pull-down list.
Next Year’s School:
Þ Select the name of the school from the pull-down list where you expect the students to be enrolled for the next school year. The schools listed are the schools in your district, including your own.
Student Search Criteria
ID:
Þ Enter a string of Student ID numbers (separated by commas, no spaces) to get a specific selection list of students to be updated.
Þ Leave the field blank to select students based on other criteria.
Last Name:
Þ Enter the last name of a student or a partial last name to get a selection list of students whose last name matches or partially matches the entry.
Þ Select a letter from the Alphabet list at the bottom of this section to get a selection list of students whose first letter of their last name matches the letter selected.
Þ Leave the field blank to select students based on other criteria.
Homeroom:
Þ Select one or more Homerooms. Students assigned to the selected Homeroom(s) will appear on the list.
Þ Do not select any Homeroom(s) if you wish your selection criteria to include all students regardless of Homeroom assignment.
Grade Level:
Þ Select one or more Grade Levels. Students assigned to the selected Grade Level(s) will appear on the list.
Þ Do not select any Grade Level(s) if you wish your selection criteria to include all students regardless of Grade Level assignment.
Helpful Hint!
Select and process a single Grade Level at a time. It provides a list of students who generally have the same Next Year’s School and also provides a more manageable list to identify and uncheck any exceptions.
Gender: <Both>
Þ Accept the default to include both Male and Female students in the list.
Þ Select Male from the pull-down list to only have male students appear on the list.
Þ Select Female from the pull-down list to only have female students appear on the list.
Shop:
Þ Select one or more Shop areas. Students assigned to the selected Shop(s) will appear on the list.
Þ Do not select any Shop areas if you wish your selection criteria to include all students regardless of Shop assignment.
Status:
Þ Accept the default of Enrolled to only list students enrolled in the current Academic Year.
Þ Select Incoming from the pull-down list to only include Incoming students on the list.
Sort: <Name>
Þ Accept the default to have the students listed in alphabetical order by last name, first name.
Þ Select Homeroom/Name to have the list in Homeroom order with the students listed in alphabetical order within each Homeroom.
Þ Select Grade Level/Name to have the list in Grade Level order with the students listed in alphabetical order within each Grade Level.
Þ
Click
![]() to process your selections.
to process your selections.
Students Selected to Update
A list of students who match your selection criteria will be displayed.
Þ Uncheck the exceptions. For example, students who are not moving-on to the next school in your District because they are moving out of the District, going to a private school, being retained, etc.
Þ Use the Clear All option to remove all checks and then select the few who may be going to a different school within your District from that of the majority of students.
Þ
Click
![]() to process and update the checked
students.
to process and update the checked
students.
Top of the Document Close Window
Step 3. Define your Academic Year Schedule Parameters.
Þ Select <Scheduling System> <Maintenance> <Academic Year Settings>. This screen allows you to define those fields which dictate the basic format of your schedule. These settings are unique for the school and the academic year. Your school is designated by default. If you need to define the values for a different school, then you must re-set your default School in <My Data> <Set Default School>, logout and log back in to be sure and get the correct parameters.
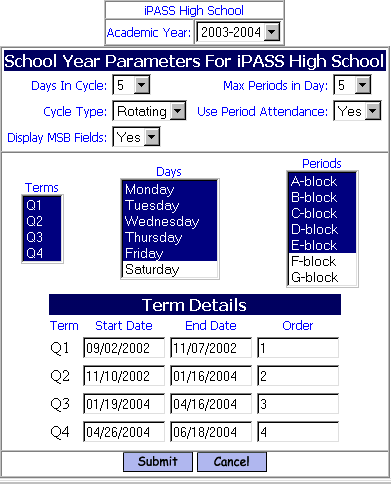
Academic Year:
Þ Select the correct Academic Year from the pull-down list to define the coming year’s schedule parameters.
Days in Cycle:
Þ Define the number of days in your scheduling/rotation cycle. This value MUST be the same as the current year if you plan to copy over the Course Catalog and its Schedule in Step #4.
Max Periods Days in Cycle:
Þ Define the maximum number of periods that will meet on any one normal school day. This value MUST be the same as the current year if you plan to copy over the Course Catalog and its Schedule in Step 4.
Cycle Type:
Þ Select Fixed from the pull-down list if the periods in your schedule have the same meeting time everyday.
Þ Select Rotating from the pull-down list if the periods in your schedule have different meeting times on different days.
Use Period Attendance:
Þ Select Yes from the pull-down list if you plan to have Period Attendance entered on a day-to-day basis. If teachers are only entering Period Attendance as an entry along with their Term grades, then Do Not set this parameter to Yes.
Þ Select No if you are not recording Period Attendance on a day-to-day basis.
Display MSB Fields:
Þ Select Yes if you plan to use the i PASS Master Schedule Builder (MSB). If set to yes, then additional fields will be available on the Course Details page for defining various parameters associated with the Master Schedule Builder.
Þ Select No if you do not plan on using the Master Schedule Builder.
Terms:
Þ Highlight the Term Codes that you wish to use for the new Academic Year. The available Terms are defined in <Scheduling System> <Maintenance> <Term Codes>.
Days:
Þ Highlight the Day Names that you wish to use for the new Academic Year. Highlight the same number of day names as the number of Days in Cycle that you indicated above. The available Days are defined in <Scheduling System> <Maintenance> <Day Names>.
Periods:
Þ Highlight the Period Names that you wish to use for the new Academic Year. The number of period names highlighted may be greater than the Max Periods in Day as indicated above. This would be the case if you have a “drop period rotating schedule”. The available Periods are defined in <Scheduling System> <Maintenance> <School Periods>.
Term Details:
Enter the Start Date, End Date and Order for each of the terms. This option may not appear until after you have submitted the settings above. Start and end dates can be filled in and modified at a later time when the School Committee/Board has approved a new school calendar and the term divisions have been set.
Term Details may also be set in <Scheduling System> <Maintenance> <School Terms>.
NOTE: Do Not overlap the Term Dates. Do Not leave gaps in the Term Dates
Þ
Click-on ![]() to save your changes.
to save your changes.
Top of the Document Close Window
Step 4. Rollover the Course Catalog
This page allows you to define which data you will copy, where it is copied from and where it is copied to. Course detail information will be copied, including the identification of sections. You need to decide if you wish to also copy the schedule information (teacher assignments, room assignments and meeting times (terms, days, periods)) for each section. Your Rotation will also be copied.
This option should be used for creating your Course Catalog for the new year. If you were to move all your courses from the <Course Description> table, then all <Course Details> fields would nee to be re-defined.
Þ Select <Administration> <End of Year Procedures> <Rollover Courses>.
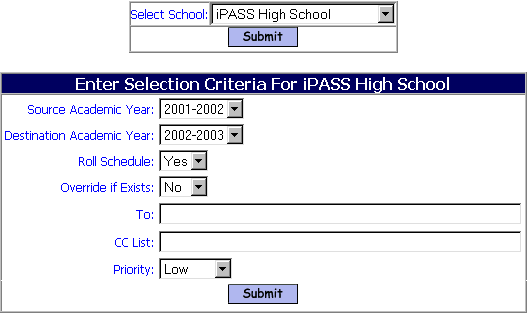
School: <Your Default School>
Þ Accept the School whose name appears by default. This is the name of the default school that you have selected or has been assigned to you.
Þ If you are authorized to access more than one (1) school, then you can select a different school from the pull-down list of choices or you can change your default school under <My Data> <Set Default School> for this program.
Source Academic Year:
Þ Accept the current Academic Year which appears by default.
Þ Select a different Academic Year that you will copy FROM.
Destination Academic Year:
Þ Accept the next Academic Year which appears by default.
Þ Select a different Academic Year that you will copy data TO.
Roll Schedule: <Yes>
Þ Accept the default value of Yes to copy Schedules (teacher assignments, room assignments and meeting times (terms, days, periods)) for each section in addition to the Course Details of each course. Select this option if you plan to tweak the existing Master Schedule, making some adjustments based on staff, course offerings, requests, funding, etc.
Þ Select No to copy only the details of each course and not copy the schedules of the course sections. Select this option if you plan to start from scratch and define for Master Schedule (teachers, rooms and meeting times) for the coming year, or if you plan to use the i PASS Master Schedule Builder (MSB).
Þ DO NOT “Roll Schedule” if you have changed the schedule parameters (Days in Cycle and Period in the Day) in “Academic Year Settings” for the new year.
Override if exists:
Þ Accept the default of No if this is the first time you have done this procedure.
Þ Select Yes if you had copied over the data previously and wish to replace it.
Helpful Hint!
If you rollover the courses with No schedules, then you can do another rollover, using the override option, and still have the option of also copying the schedules.
If you rollover the courses with section schedules, then you cannot do another rollover as a means of having course sections without schedules. You can, of course, do another rollover, but the meeting times will remain or be updated based.
Þ
Click ![]() to enter your selection criteria and
create your courses for the coming Academic Year.
to enter your selection criteria and
create your courses for the coming Academic Year.
The courses are now available in <Scheduling System> <Course Catalog> <Course Details> to Add/Delete/Modify any of the data or to delete an entire course. If deleted, the course will remain in the Course Descriptions to be moved back in for any year.
The filled counts for each section will automatically be set to zero.
New courses for the coming Academic Year must be moved in or created and moved in using the normal procedures.
Top of the Document Close Window
Step 5. Define/Modify your Rotation
Rotation
Þ The Rotation for the next school year needs to be defined even if your course blocks do not rotate (meet in different time-slots on different days of the cycle). The Rotation determines the lay-out and the start and end times for each period to be displayed on grid formats of student, teacher and room schedules. It is also used for assigning codes to specific periods when daily attendance is defined to update period attendance. Period Names are defined in <Scheduling System> <Maintenance> <Period Names>. Day Names are defined in <Scheduling System> <Maintenance> <Day Names>.
Þ Select <Scheduling System> <Maintenance> <Rotation>
Period:
Þ Select the period for each time-slot from the pull-down list.
Start-End Times:
Þ Enter the appropriate Start and End times for each period. Times must be entered using a military time format.
Þ
Click ![]() to save your changes.
to save your changes.
Helpful Hint!
Submit the page often and save partially entered data. There is a lot of data to be entered here and if you miss a colon or the start-time is not before the end-time or the afternoon times are not in a military time format, then all entries since the last save will be wiped out. Also the keyboard combinations to cut and paste times is very helpful in filling the data fields on this page.
Rotation by Grade Level:
A separate rotation can be defined to reflect bell schedules which are different for each grade level.
In <Scheduling System><Course Catalog><Course Details>, you must define Grade Level on the section schedule screen in order to make the connection to the bell schedule that you want and therefore get student and teacher schedules which reflect that schedule.
Þ Select <Scheduling System> <Maintenance> <Rotation by GL>
Þ The same grid, as defined by your <Academic Year Settings>, must be used for all grade levels within your school.
Þ Define the Grade Level of the rotation.
Þ Define the Start and End Times for each Period in the grid.
You may leave blanks if you have a different number of courses that meet each day.
Þ
Click ![]() to save your changes.
to save your changes.
Top of the Document Close Window
Step 6. Define New Courses and move them to the Course Catalog.
This is a District specific table that is shared by all schools. Courses offered by the District are added and/or modified in this tab.
Þ Select <Scheduling System> <Course Catalog> <Course Description>.
Þ
Click
![]() at the bottom of the page to add a
new Course.
at the bottom of the page to add a
new Course.
Create a new Course:
Name:
Þ Enter the name of the Course as it will appear on most documents and reports. It will be truncated on some internal reports, such as the Master Schedule and Course Catalog reports. The full name will appear on all Report Cards, Transcripts, Progress Reports, Schedules and other reports that are given to students or sent home. Since all i PASS displays and reports default to a font which has proportional characters, it is not possible to suggest a number of characters that would be appropriate for the name of the course. The same name can be used for more than one course, but the ID must be unique within the district.
Helpful Hint!
Rename all of your Courses to be Upper/Lower case format. They look better and take up less space on critical documents like Transcripts and Report Cards.
ID:
Þ Enter the ID of the Course. Most lists will display the courses in ID order, rather than name order. The ID can be numeric, alpha or any combination of alpha-numeric characters. The course numbers must be unique within the District. If you want unique numbers for a specific school, then you must construct such a numbering scheme.
School Types:
Þ Select the school type from the pull-down list that is appropriate as an identifier for this course. School Types are District specific and are defined in the <Scheduling System> <Maintenance> <School Types>. School Types may be defined by the level of the school (Middle School, High School, etc.) or the individual school name.
Short Name:
Þ Enter an abbreviated version of the course name to appear on reports where space does not permit the printing of the full course name (e.g. Permanent Record Labels).
Description:
Þ Enter the description of this course. The description currently appears at the top of the Course Details page and will eventually be incorporated into the printing of Program of Study booklets, Narrative Report Cards, Course Request procedures and other areas.
Þ
Click
![]() to save your changes.
to save your changes.
NOTE: If you modify the Name, ID, Short Name or Description of a course, then ALL courses in ALL years in ALL schools will automatically be modified, since this is the table that stores these values. Transcript records are not affected by such a change unless you re-post a final grade.
Top of the Document Close Window
Move Courses to Catalog:
Use this option to transfer courses that have been defined for the District into the Course Catalog for your school for a specific Academic Year.
Þ Select <Scheduling System> <Course Catalog> <Move Courses to Catalog>.
Top of the Document Close Window
Academic Year:
Þ Accept the default of the next Academic Year, if that is the latest calendar year defined in the <Attendance System> <Attendance Maintenance> <Setup Calendar Years>.
Þ Select a different Academic Year from the pull-down list.
School Type: <All>
Þ Accept the default value and select the course(s) to transfer from the list of All courses defined for the District.
Þ Select a school type other than All and the list will refresh to display only those courses that were given that school type when created, then make your selection(s) from that list.
Select Courses:
Þ Click to highlight the courses that you want to move.
Þ Hold down the <Shift> key and Click on a second course to highlight all of the courses in between your first course and the second course.
Þ Hold down the <Control> key and Click on any individual courses to highlight or deselect those courses for transfer.
Select All:
Þ Click on the Select All button to highlight All courses in the Select Courses list.
Deselect All:
Þ Click on the Deselect All button to remove the highlight from all of the courses. Use this option to clear your choice and re-select the course(s) your want to move.
Þ
Click
![]() to save your changes.
to save your changes.
Top of the Document Close Window
Step 7. Student Course Requests.
Helpful Hint!
In your “Program of Studies” Booklet, include courses which you would like to offer, but provide a disclaimer that tells the students and parents that there is the possibility that some courses listed in the booklet may not be scheduled in the coming year because of insufficient enrollment or funding. Also note that requested Elective courses may not be available to particular students based on conflicts with other (required or elective) courses.
Top of the Document Close Window
Step 7A. Enter Course Requests for Individual Students.
Þ Select <Scheduling System> <Requests> <Add/Modify Requests>.
Þ Select the student from the list displayed, based on your filtering criteria.
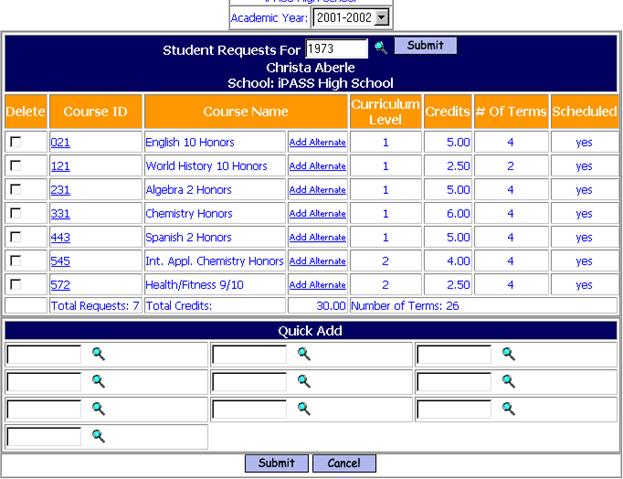
Academic Year:
Þ Accept the NEXT Academic Year from the pull-down list. This will remain the default as long as you are in this program. The ID# and name of the student will appear at the top. If courses have already been requested, then they will be listed above the Quick Add section of the page.
Helpful Hint!
IMG has tried to make this process as quick and easy as possible, while still giving you the features and immediate information that you need.
We suggest that Counselors enter the data when meeting with the student to discuss their requests.
A well thought-out data-entry document facilitates the process and should contain the student’s ID#, Name, Grade Level and clearly indicate the student’s choices with Course Id#s. Course Request Selection sheets should be color-coded by Grade Level indicating choices only available to that Grade Level. Encourage the selection of alternate courses. Require signatures as a commitment by both the student and the parents. Use ID labels on the form to insure readability, correct ID#s and that everyone get one. You may want to use the <Biographical System> <Reports> <Comment Labels> to attach to your Course Selection sheets. This will provide a legible ID# and Name and provide room for a comment, such as a return deadline and notice of informational meetings.
Quick Add
Þ Enter the ID number of the student’s first course selection.
Þ Press <Enter> to get to the next field and enter the student’s next choice.
Þ Press <Tab> or click on the Magnifying Glass icon to see a list of courses filtered by Course ID, Name, Grade Level or Department. Click on the course to pull it into the student’s requests.
Þ
Click ![]() to save the requests.
to save the requests.
Helpful Hint!
There are several Parameters that may be helpful to you in the entry process.
Þ Select <System Configuration> <Parameter Maintenance> <Application = TEAM> <Parameter Group = Scheduling>
Increment Priority Value on Adding Requests:
Þ Set the Parameter Value to Yes if you want the scheduling priority of the first course entered for each specific student to be 1, the second entry to be Priority 2 and so on. The priorities can be changed as you go along, they are not hard coded. This feature was added specifically for entry of Career/Tech Exploratory courses where students make specific choices.
Þ Set the Parameter Value to No if you want the scheduling priority to be blank for each course. If the priority is blank and it is not modified by a later process, then the priority of the course with the value defined for the course in course details.
Number Add Alternates:
Þ Set the Parameter Value to whatever number of Alternate requests you want to allow per course.
Number Add Requests:
Þ Set the Parameter Value to whatever number of request boxes you wish to appear on the page. This is not an absolute limit. If all the boxes are filled with requests, then when you click Submit there will be a new set of empty boxes to fill.
Set Priority on Adding Requests:
Þ Set the Parameter Value to Yes if you want the option to set the Priority of the request when it is entered. This parameter must be set to Yes if you want the values incremented.
Þ Set the Parameter to No and the Priority option will not be displayed.
Þ
Click ![]() to save
the parameter changes.
to save
the parameter changes.
Requests will be listed with Priority, Course ID, Course Name, Curriculum Level, Credits, Number Terms and if the course is scheduled or not.
Alternate Courses will also be listed below the initial course request with its Course ID, Course Name, Curriculum Level, Credits and Terms.
Þ Click on the Course ID or “Add Alternate” to:
· Add an Alternate Request for this course.
· Edit the Credits for this course.
· Edit the scheduling Priority for this course.
· Edit the Curriculum Level of this course.
Þ Enter a new Student ID # and Press <Enter> to get to another student.
Þ Click on the Magnifying Glass icon to select another student, then
Click
![]() to display an
entry page for this student.
to display an
entry page for this student.
Top of the Document Close Window
Step 7B. Mass Load Student Course Requests.
There are two (2) programs for mass loading of student requests <Mass Load Schedules & Requests> and <Mass Add Student Requests>. The first is more versatile, the second more specific. A third program <Mass Delete Student Requests> is also described in this step.
Mass Load Student Requests:
This program has many options which allow you to Mass Load Course Requests or Mass Schedule Courses.
Þ Select <Scheduling System> <Requests> <Mass Load Schedules & Requests>.
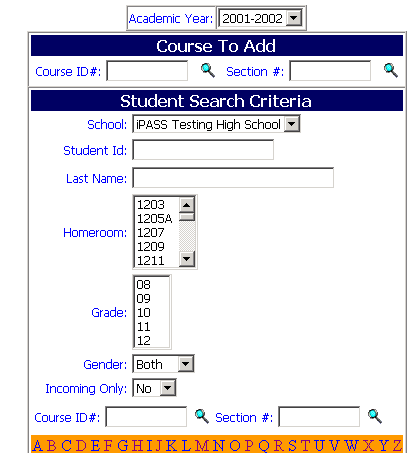
Academic Year:
Þ Select the correct Academic Year from the pull-down list to define the coming year’s schedule parameters. BE SURE YOU HAVE DEFINED THE CORRECT ACADEMIC YEAR.
Course To Add
Course ID#:
Þ Enter the ID of the Course you want to mass load as a request. DO NOT enter a Section #.
Þ Click on the Magnifying Glass icon to search the Course Catalog for the correct course.
Section #:
Þ DO NOT enter a Section #, if you are only loading requests.
Þ Enter a Section # ONLY if you want the system to SCHEDULE the student(s) into that Course and Section.
Student Search Criteria
School: <Your Default School>
Þ Accept the default of your school.
Þ Select another school within your District from the pull-down list.
Student ID:
Þ Enter a string of Student ID numbers (separated by commas, no spaces) to get a specific selection list of students to be updated.
Þ Leave the field blank to select students based on other criteria.
Last Name:
Þ Enter the last name of a student or a partial last name to get a selection list of students whose last name matches or partially matches the entry.
Þ Select a letter from the Alphabet list at the bottom of this section to get a selection list of students whose first letter of their last name matches the letter selected.
Þ Leave the field blank to select students based on other criteria.
Homeroom:
Þ Select one or more Homerooms. Students assigned to the selected Homeroom(s) will appear on the list.
Þ Do not select any Homeroom(s) if you wish your selection criteria to include all students regardless of Homeroom assignment.
Grade Level:
Þ Select one or more Grade Levels. Students assigned to the selected Grade Level(s) will appear on the list.
Þ Do not select any Grade Level(s) if you wish your selection criteria to include all students regardless of Grade Level assignment.
Helpful Hint!
Select and process a single Grade Level at a time. It provides a list of students who generally have the same request and also provides a more manageable list to identify and uncheck any exceptions.
Gender:
Þ Select the default of both to see both males and females.
Þ Select Male to see only males.
Þ Select female to see only females.
Incoming Only:
Þ Select the default of No to load the request for all Enrolled and Incoming students.
Þ Select Yes to load the request for Incoming students only.
Course ID#:
Þ Enter the ID of the Course to get a selection list of students who already have this course as a request (scheduled or not).
Þ Click on the Magnifying Glass icon to search the Course Catalog for the correct course.
Section #:
Þ Do Not enter a Section # to get a selection list of students who have this course as a request or are already scheduled into some section of this course.
Þ Enter a Section # ONLY if you want to get a selection list of students who are already scheduled into a specific course and section.
Þ
Click
![]() to process your selections.
to process your selections.
Students Selected to Update
A list of students who match your selection criteria will be displayed.
Þ Uncheck the exceptions.
Helpful Hint!
Students not returning or not coming back should not have a Next Year’s School set for them. This would remove them from the list, so they would not have to be identified as exceptions.
Þ Use the Clear All option to remove all checks and then select the few who should not have this course added.
Þ
Click
![]() to process and update the checked
students.
to process and update the checked
students.
NOTE: You cannot mass load a request for a course if the student is already requesting or scheduled into that course. This can only be done in <Modify (Student) Schedules>.
Helpful Hint!
Check the report in <My Data> <My Reports> for any errors. Also, do not start a new process of adding requests until you know that the most recent one has been completed.
Top of the Document Close Window
Mass Add Student Requests
Þ Select <Scheduling System> <Requests> <Mass Add Student Requests>.

Academic Year:
Þ Select the correct Academic Year from the pull-down list to define the coming year’s schedule parameters. BE SURE YOU HAVE DEFINED THE CORRECT ACADEMIC YEAR!
Existing Request for Course ID#:
Þ Select the Course ID which the student(s) already has, either as a request or as a scheduled course.
Add Request for Course ID#:
Þ Select the Course ID you wish to Add.
Þ
Click
![]() to process and update ALL
students.
to process and update ALL
students.
Helpful Hint!
There is NO filtering to select specific students. ALL students requesting or scheduled into the first course will get the second course as a request.
Check the report in <My Data> <My Reports> for any errors. Also, do not start a new process of adding requests until you know that the most recent one has been completed.
Top of the Document Close Window
Mass Delete Student Requests
Þ Select <Scheduling System> <Requests> <Mass Delete Student Requests>.
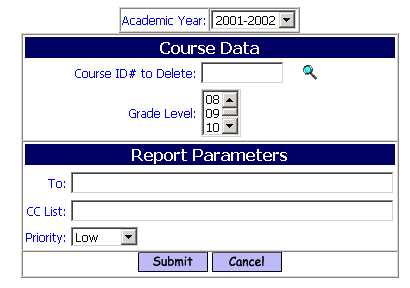
Academic Year:
Þ Select the correct Academic Year from the pull-down list to define the coming year’s schedule parameters. BE SURE YOU HAVE DEFINED THE CORRECT ACADEMIC YEAR.
Course ID# to delete:
Þ Select the Course ID which the student(s) already has, either as a request or as a scheduled course, that you wish to delete.
Þ
Click
![]() to process and update ALL
students.
to process and update ALL
students.
Grade Level:
Þ Select one or more Grade Levels. Students assigned to the selected Grade Level(s) will appear on the list.
Þ Do not select any Grade Level(s) if you wish your selection criteria to include all students regardless of Grade Level assignment.
Helpful Hint!
There is NO filtering to select specific students. ALL students requesting or scheduled into any sections of this course will have the course deleted. The Course will not be deleted if grades exist.
Check the report in <My Data> <My Reports> for any errors. Also, do not start a new process of adding requests until you know that the most recent one has been completed.
This option may be helpful in removing un-graded Semester 1 Study Halls from student schedules after the semester has ended.
Top of the Document Close Window
Step 8. Print Reports to Verify Request Data.
The following reports, in alphabetical order by title, are specific to Student Course Requests and basic field values. The output references in this document, in this section and others, are based on the RTF format of each report. There will be variations when looking at other formats.
Þ Select <Scheduling System> <Reports>.
Þ Print samples for each from the current school year if you are unfamiliar with there content and determine which are appropriate for your needs.
Top of the Document Close Window
<Course Catalog (Parameters)> Report
Used to: Review the values set for courses which affect GPA, Honor Roll, Averaging and other reports and programs.
Filter By: Academic Year, Department, a single Course or a range of Courses.
Sort By: Course or Department.
Output: Course ID, Course Name, Major/Minor, Used for GPA, Curriculum Level, Print Class Lists, Print on Transcripts, Print on Failure List, Is a Pass/Fail Course, Use for Horizontal Averaging, Use for Vertical Averaging, Vertical Weight, Honor Roll Type. This is a landscape formatted report.
Helpful Hint!
When selecting From/To Course-Section for this report or others with this filter option, you may:
1) Leave the From/To Course ID fields blank to get Class Lists for ALL courses.
2) Enter a single From Course ID without a section and without a To Course Id to get lists for all sections of the Course.
3) Enter a single From Course-Section ID to get a single class list.
4) Enter a From Course ID, without section, and a To Course ID, without section, to get class lists for ALL Courses in that range, inclusive.
NOTE: Entering a From Course-Section ID and a To Course-Section ID will not get you every section of every course within the range.
Top of the Document Close Window
<Course Catalog (Scheduling)> Report
Used to: Review the values set for courses which affect scheduling.
Filter By: Academic Year, Department, a single Course or a range of Courses.
Sort By: Course or Department.
Output: Course ID, Course Name, Department, # of Sections, Maximum number of seat (total in all sections), Course Type, Priority, Credits, Has Meeting Time, Linked to (Course #) and Grade Level range. This is a landscape formatted report.
Top of the Document Close Window
<Course Request Tally> Report
Used to: Determine the number of sections of a Course that may be needed by showing how many students in each YOG are requesting the selected Courses. Also to identify any data entry errors.
Filter By: Academic Year, Department, a single Course or a range of Courses, YOG, Include courses with no Requests, week/ alternatives.
Sort By: Course or Department.
Output: Course ID, Course Name, Department, # of Sections, Maximum number of seats (total in all sections) and # of students requesting each Course by YOG and Total # of requests.
Top of the Document Close Window
<Courses/Credits/Terms> Report
Used to: Determine which students have requested too few or too many courses.
Filter By: Academic Year, Student Id string, Homeroom, Grade Level, scheduled courses only.
Sort By: Name, Grade Level, Homeroom, Gender, Total Courses, Total Terms, Total Requested Credits or Total Earned Credits.
Output: ID, Name, Grade Level, Gender, YOG, Homeroom, # of Courses, # of Terms, # of Credits (Requested) and # of Earned (Credits).
NOTE: This report may also be used to determine the total credits earned by each student or the total credits that a student is scheduled into. To calculate credits, you need to run the program <Grading System><Maintenance><Calculate Earned Credits>.
Top of the Document Close Window
<Requests (Counselors)> Report
Used to: Validate students’ requests to determine that the requests are appropriate in selection and number.
Filter By: Academic Year, Student Id string, Homeroom, Grade Level or Counselor.
Sort By: Name, Grade Level or Homeroom.
Output: Two (2) students per page. Header: ID, Name, Homeroom, Grade Level, Gender, Counselor and YOG. Body: Course ID, Name, Curriculum Level, # of Credits, # of Terms and any Alternate Course Requests. Footer: Total # of Courses, Credits and Terms.
<Requests Verifications (PCL)> Report
Used to: Create a report that can be taken home for parental approval and confirmation of the requests that have been entered into
i PASS.
Filter By: Academic Year, Form, Student Id string, Homeroom, Grade Level or Counselor.
Sort By: Name, Grade Level, Homeroom or Zip Code.
Output: This is a PCL document. The output can be custom defined and designed by you. Typically the output would include: Header: Student ID, Name, Grade Level, YOG, Homeroom and Counselor. Body: Course ID, Course Name, # of Credits, # of Terms and any Alternate requests. Footer: Total # of Courses, Total # of Credits (Requested) and Total # of Terms along with a comment area and place for the signature of the Student and of the Parent/Guardian.
<Students Requesting a Course> Report
Used to: Determine the names of the students who have requested one or more specific courses.
Filter By: Academic Year, Department, a single Course or range of Courses, Include Alternatives, Cycle/Cluster.
Sort By: Course/Student Name, Course/Grade Level/Student Name, Department/Student Name or Department/Grade Level/Student Name.
Output: Header: Course ID, Course Name Department. Body: Student ID, Name, Homeroom, YOG, Gender and Grade Level. Footer: Total Males, Total Females and Total Students.
Top of the Document Close Window
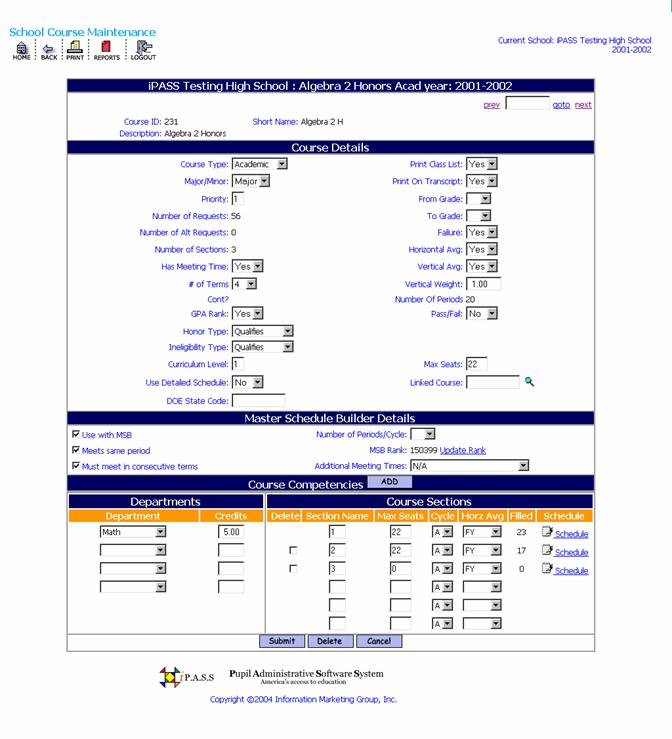
Step 9. Edit the Course Catalog Details.
The Course Details, including the sections, were rolled over in Step #4 as well as the schedule Rotation. Based on the data in your reports, the number of sections, other values (number of seats, credits, curriculum level, etc.) and the rotation may need to be modified.
Course Details:
Þ Select <Scheduling System> <Course Catalog> <Course Details>.
Þ Use these fields to:
Ÿ define newly created courses that have been moved to your course catalog;
Ÿ modify the number of Terms, Number of Sections, Section Numbers, Priority, Max Seats, Linking, etc.;
Ÿ delete courses or extra sections of courses that you don't want or need for the new school year. You may NOT delete a course which has students assigned to it. You must delete these assignments first.
Þ The Course Details data is unique to the Academic Year. Changes do not, nor should they, effect data for previous years, including Transcripts.
Þ Teacher, Room, Term and Meeting Time assignments can be changed in <Course Schedule> or by clicking on the Schedule link to the right of the section information.
Þ Every Course MUST have at least a single Section defined! The section can have whatever ID you wish, but it cannot be deleted.
Course Details
Top of the Document Close Window
Course Type:
Except for Study Halls, these Types are only referenced as a sorting option when printing the <Master Schedule>. Course Types are defined in <Scheduling System> <Scheduling Maintenance> <Course Types>.
Þ Select a Course Type (e.g. Lunch, Study Hall, Arts, Shop, Exploratory) from the pull-down list.
Major/Minor: <Major>
Major/Minor is used in setting the Honor Roll and Ineligibility Rules for your school.
Þ Accept the default value or select <Minor> from the pull-down list.
Priority: <5>
The Priority value determines which courses are processed first by the Scheduler. All courses with a Priority of one (1) are attempted before any other courses.
This value is also used as a factor in prioritizing courses when using the i PASS Master Schedule Builder (MSB).
Þ Accept the default value or enter any other number from 1-99.
Number of Requests:
This is a calculated field based on the students’ Course Requests.
Number of Alt Requests:
This is a calculated field based on the students’ Alternate Course Requests.
Number of Sections:
This is a calculated field based on the Sections that have been defined for this Course. This value is also used as a factor in prioritizing courses when scheduling students, and in prioritizing courses when using the i PASS Master Schedule Builder (MSB). (Singletons are scheduled before doubletons.)
Has Meeting Time:<Yes>
Þ Accept the default value to be able to assign meeting times (Periods and Days) for sections of this course.
Þ Select No from the pull-down list if you do not want the sections of this course to have meeting times. They will still require Terms, Rooms and Teachers and can be given Grades and included in Honor Roll and GPA calculations, if you wish. Teacher entry of Period Attendance on a daily basis does not apply to Non-Meeting Time courses. The courses can have Period Attendance numbers entered at the time report card grades are entered.
# of Terms: <0>
This value is used in various Course Request reports to determine the number of terms a section of this course would meet to determine if a student has made too few or too many requested based on the number of Terms. This value is also used as a factor in prioritizing courses when scheduling students, and in prioritizing courses when using the i PASS Master Schedule Builder (MSB). (4 Term courses are scheduled before 2 Term courses.)
Þ Select the number of terms each section of this course will from the pull-down list.
GPA Rank <Yes>:
Þ Accept the default value if you want this course to be used in GPA (Grade Point Averaging) and Ranking.
Þ Select the value of <No> from the pull-down list to ignore this course when calculating GPA and Ranking.
Honor Type:
These Calculation Types are used to determine how each course is considered in Honor Roll calculations. They are defined in the <Grading System> <Maintenance> <Calculation Types>.
Þ Select Not Consider – Ignore this value and Calculate others and the grades earned in this course will not be considered, positively or negatively for Honor Roll based on the defined criteria.
Þ Select Disqualifier – Do not do any calculations and the student will be ignored completely for Honor Roll if they have a grade which is also defined as a Disqualifier.
Ineligibility Type:
These Calculation Types are used to determine how each course is considered in Ineligibility calculations. They are defined in the <Grading System> <Maintenance> <Calculation Types>.
Þ Select Not Consider – Ignore this value and Calculate others and the grades earned in this course will not be considered, positively or negatively for Ineligibility based on the defined criteria.
Þ Select Disqualifier – Do not do any calculations and the student will be ignored completely for Ineligibility status.
Curriculum Level:
Þ Accept the default value of Zero (0) if you do not want this course to be used for GPA/Rank.
Þ Enter the Curriculum Level to be used for the GPA/Ranking of this Course.
Use Detailed Schedule: <No>
This option will allow you to select different Teachers and/or different Rooms for each individual Period and Day in the Section Schedules for this Course. Refer to Section #15. Study Halls for more information about this option.
Þ Accept the default value if you do not wish to use the Detailed Schedule option.
Þ Select Yes if you wish to take advantage of this feature for ALL sections of this course.
DOE State Code:
If this course qualifies as an Advanced Placement Course then enter the Massachusetts DOE course code here.
Þ Leave this blank if the course is not an Advanced Placement Course or you do not need to report to the Massachusetts DOE.
Print Class List: <Yes>
If you have scheduled Lunch as a period or defined some other course for identification purposes (Middle School Teams), then you may not want to print Class Lists every time. This option may be toggled on/off should you need lists only at certain times.
Þ Accept the default value to print Class Lists for this course.
Þ Select No from the pull-down list to not print Class Lists.
Print on Transcript: <Yes>
This field is important to exclude Study Halls, which may receive grades.
Þ Accept the default value to include this course and its grades on Transcripts.
Þ Select No from the pull-down list to not include this course on transcripts.
From Grade / To Grade:
These values are only used for scheduling Study Halls. See Section #15. Study Halls for more information about this option.
Þ Define the grade level range that you want to include in this course.
Failure: <Yes>
Þ Accept the default value to include this course in a list of students with Failing Grades or any grade or combination of grades. The report is <Grading System> <Reports> <Pass/Fail> list.
Þ Select No from the pull-down list to not include this course in this report..
Horizontal Avg. <Yes>
Horizontal Averaging will use the Horizontal Averaging/Percentage Rules to calculate a Semester or Final Average for courses. This flag is not considered when Horizontal Averaging Rules are used for GPA calculations.
Þ Accept the default value to include this course in Horizontal Averaging.
Þ Select No from the pull-down list to exclude this course from Horizontal Averaging.
Vertical Avg. <Yes>
Vertical Averaging will average all grades in a selected Grade Headings (columns). This option is sometimes used for Honor Roll or Eligibility.
Þ Accept the default value to include this course in Vertical Averaging.
Þ Select No from the pull-down list to exclude this course from Vertical Averaging.
Number of Period:
This is a calculated field.
Pass/Fail:<No>
This field is only used if you are also using Horizontal Averaging. Pass/Fail course will yield a Passing grade (P) if all grades included in the calculation are Passing grades. A Failing grade (F) will result if any one (1) of the grades being considered is an F.
Þ Accept the default if this course is not graded as a Pass/Fail course.
Þ Select Yes if the course is graded as Pass/Fail. Pass/Fail courses that are also used in Horizontal Averaging are considered differently from other courses.
Max Seats:<0>
This value times the number of sections defined is used in the Course Request Tally report and other scheduling reports to determine the total maximum seats for all sections of this course. It is not a default or a limit for the sections which have their own Max Seats values.
Þ Enter the Maximum number of seats allowed for each section of this course.
Linked Course:
i PASS will allow you to link courses to courses and/or course-sections to course-sections in the <Course Catalog> <Course Details>.
Linking is used to insure that the same group of students are in the same courses or the same courses and sections for each of the courses or courses and sections in the link chain.
NOTE: Linking is only a factor when running the Scheduler, either from the <Scheduling System> or using the checkbox to at the bottom of the student’s <Schedule Summary> page to “Submit Student Scheduler”, if that right is available to the User. It is NOT considered when modifying an individual student’s schedule. It is NOT considered when using the i PASS Master Schedule Builder (MSB).
You may or may not add the linked course to a student’s request. It will not be added automatically to the students’ requests list.
Linking assignments are shown in the <Course Catalog (Scheduling)> report.
Þ Enter the course you wish to link to this course.
Þ Click on the magnifying glass icon to search the Course Catalog.
Master Schedule Builder Details
This area will be displayed only if you have set the parameter in <Administration> <School Resources> <Academic Year Settings> <Display MSB Fields> to Yes. These fields will be described in Step # 11A of this document.
Course Competencies Add
This area allows you to define one or more sets of Competencies for Academic or Career/Technical Education courses. A presentation and discussion of this area will be included in the Fall – Grade Reporting - Users Group Meeting. Please contact IMG for additional information if you wish to take advantage of the use of Competencies prior to that meeting.
Departments Course Sections
Department:
Þ Select the Department or Departments that this course should be associated with for reporting and earning credits.
NOTE: A Department must be entered to have the course appear in a Master Schedule report or in other Master Schedule search features.
Credits:
Þ Enter the number of credits for each department to be earned for this course if a student receives a passing grade. These are also the attempted credits that will be used in GPA calculations.
NOTE: The credits for a course may be modified for individual students in <Modify Schedules>.
Delete Sections that you do not need.
Þ Check the Delete box to the left of the section(s) you wish to delete. Only sections with no schedule can be deleted. If you copied the schedule in the Rollover process, then you will need to click on the Schedule of the section and delete the schedule for that section first.
Helpful Hint!
If the section in the first/top position is one that you wish to remove, then re-name it with a name that will move it down the Alpha-Numeric list, and submit. The section will now be listed below the first/top position and can be deleted.
Add new Sections that you will need.
Þ Enter the Section Name and Max Seats for each new section in any of the three blank fields at the bottom of the Course Sections list.
Remember that the Section Name is an alpha-numeric field. You may wish to redefine how you identify sections of Courses.
Section Name:
Þ Enter a name for each section. The section name can be any alpha-numeric combination (Examples: 1, 01, 104, A2, F4). They can be the number of the period they meet, a homeroom, include a code number or letter such as a term, group, level, cycle, etc. While there is no limit to the length of the name, more than 4 characters may cause difficulty in reading some reports.
Max Seats:
Þ Enter the Max Seats for each section. Individual Users may be given rights to exceed the Max Seats and schedule a student. Adding extra students to a section does not increase the Max Seats setting here.
Cycle:
The cycle codes are defined in the <Administration><School Resources> <School Profile>. The School must be set to “Technical School = Yes”
Þ Select the Cycle/Cluster in which each section meets.
Top of the Document Close Window
Horz avg: (Horizontal Averaging)
These names must also be defined if you calculate GPAs. The names can be automatically assigned using <Scheduling System> <Course Catalog> <Assign Horizontal Averaging Rules to Sections (Assign Horz Avg to Section)>.
Þ Select the name of the Horizontal Averaging/Percentage Rule that applies to each section, based on the Terms that the course meets.
Helpful Hint!
The Horizontal Averaging Rule for the sections can be assigned globally after your Master Schedule has been finalized. <Scheduling System> <Course Catalog> <Assign Avg. Rule to Sections>.
Filled:
This is a calculated field which displays the number of enrolled students scheduled into each section.
There are occasions when the filled count for a course gets out of sync. The following program and resulting report can be run at anytime. <Scheduling> <Maintenance> <Calculate Filled Count>.
Used to: Calculate and update the fill counts for scheduled courses.
Filter By: Academic year, Enrolled Only, and allows you to Update Fill Counts Yes/No.
Sort By: Course ID, Course Name, Filled Count or Difference.
Output: Course ID, Course Name, Maximum, Fill, Actual Count and Difference.
Þ
Click-on ![]() to save your changes.
to save your changes.
Top of the Document Close Window
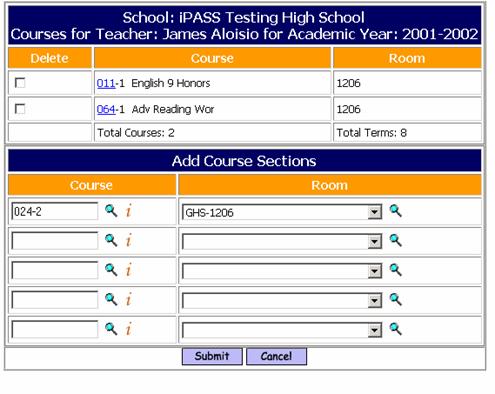
Step 10. Define the Teacher & Room Assignments for Each Section.
Generally this task is given to Department Heads to make their recommendations to the Principal. This information will need to be determined regardless of the method you choose to create your Master Schedule.
Top of the Document Close Window
Step 11. Create the Master Schedule.
This step offers two (2) alternatives, using the i PASS Master Schedule Builder (See sub-sections 11A & 11B) or manually building your Master Schedule (See sub-sections 11C & 11D) either from scratch or by making modifications to the data you copied from the current Academic Year.
“Master Schedule” in this document refers to the assignment of teachers, rooms, terms, meeting days and meeting periods.
Using the Master Schedule Builder (MSB)
NOTE: The Master Schedule Builder does NOT consider cycles/clusters when assigning students. In order to use the MBS with cycles/cluster restrictions, you must have unique courses defined that are specific to your cycles or clusters.
Top of the Document Close Window
Step 11A. Define MSB Parameters
There are four (4) areas where parameters need to be defined that affect the processing of the Master Schedule Builder, Course Details, Rank Courses, Teacher Constraints and Assign Teachers/Rooms.
I. Course Details.
Þ Select <Scheduling System> <Course Catalog> <Course Details>.

Course Details
Several fields in this section need to be defined correctly in order to schedule sections of a course using the MSB and to have the course properly ranked for use with the MSB.
Priority:
The Scheduling Priority determines when in the scheduling process a course will be placed or where it will be ranked. It is a key factor in determining the Ranking value of the course for use with the MSB. It is also a key factor when you run the Student Scheduler.
One (1) is the highest value. Courses with a Priority of one (1) will be scheduled or attempted before any other courses.
The Priority can be set to any value. Keeping in a range of 1-99 is recommended. Five (5) is the default value.
Þ Accept the default values of (5).
Þ Select a higher or lower value to define the Scheduling Priority for this Course.
Has Meeting Time:
Þ Select Yes if you want this course to be scheduled into one or more Period/Day meeting times.
Þ Select No if you do to want to define a meeting time for this course. You may still define a Teacher, Room and Terms and be able to grade students in courses that do not have meeting times. Courses with no meeting time will not be processed in the MSB. Students would need to be scheduled into these courses by running the student scheduler or by using the <Mass Load Schedules & Requests> program.
Terms:
The number of Terms is a factor in determining the Ranking value of the Course for use with the MSB.
Þ Define the number of Terms that this course will meet during the school year.
Master Schedule Builder Details
It is assumed that you have set the “Use MSB Fields” value to “Yes” in Step #3 – <Academic Year Settings>.
Use with MSB
Þ Check the box to Use this course with the Master Schedule Builder.
Þ Do not check the box if you plan to delete this course or manually schedule this course.
Meets same Period
This feature is used when the MSB is run without manual intervention.
Þ Check the box if you want this course to meet in the same period everyday that it will be scheduled.
Þ Do not check the box if the course can meet in different periods on different days.
Must meet in consecutive terms
This feature is used when the MSB is run without manual intervention.
Þ Check the box if you want this course to meet in consecutive terms.
Þ Do not check the box if the course does not have to meet in consecutive terms.
Number of Periods/Cycle:
The number of Periods per Cycle is a factor in determining the Ranking value of the Course for use with the MSB.
Þ Enter the number of periods that the course will meet during your rotation cycle.
NOTE: The MSB will return an error message if you try to schedule a course into too few or too many meeting times. The error message will display a number which is the number of terms times the number of periods/cycle.
MSB Rank:
The Rank is a calculated value. The lower the Rank the higher the priority for the course to be scheduled.
The six-digit number is determined as follows: ABCDEF
A = the priority of the Course
B = 9 minus the number of Terms
CD = the number of sections
EF = 99 minus the number of periods/cycle
Update Rank
Þ Click on the hyperlink to re-calculate the MSB Rank for this course. Be sure that you have submitted any changes before you re-rank the course.
Additional Meeting Times:
This field is referenced by the MSB to locate an extra period for a course that meets more than one period each day. This feature is used when the MSB is run without manual intervention.
Þ Select the default N/A to ignore this feature.
Þ Select Either Period Before or After to have the MSB select extra periods either before or after the primary period.
Þ Select Period Before to have the MSB select extra periods only before the primary period.
Þ Select Period After to have the MSB select extra periods only after the primary period.
Þ Select Anytime to have the MSB select extra periods at anytime in the matrix.
Course Sections
Add/Modify/Delete Sections in order to have the correct number of sections that you expect you will need at this time based on student course requests and staffing. The number of Sections is a factor in determining the Ranking value of the Course for use with the MSB.
Top of the Document Close Window
II. Rank Courses.
Þ Select <Scheduling System> <Master Schedule Builder> <Rank Courses>.
Academic Year:
Þ Select the correct Academic Year from the pull-down list to define the coming year’s schedule parameters.
Þ
Click
![]() to process and re-rank your
courses.
to process and re-rank your
courses.
III. Teacher Constraints.
Þ Select <Administration> <School Resources> <Teachers/Staff>.
There are two (2) parameters that can be set for individual teachers.
Max Consecutive Periods:
This feature is used when the MSB is run without manual intervention. This option has not yet been implemented.
Þ Select a number from the pull-down list.
Exclude Periods:
These periods will be highlighted in red on the MSB scheduling page as a indicator. You may still schedule a teacher into those periods if you wish. Teachers will not be scheduled into those periods when you run the MSB run without manual intervention.
Þ Click Period to open a new screen where you can select the Academic Year and the period(s) that this teacher should not be assigned to classes.
Þ
Þ
Top of the Document Close Window
IV. Assign Teachers and Rooms.
Þ Select <Scheduling System> <Master Schedule Builder> <Teachers/Rooms>.
Course sections cannot be assigned a meeting time (periods and days) unless they have already been assigned to a teacher and room. Assignments can also be made directly from the MSB scheduling page.
Þ Select a Teacher from the filtering page.
Þ Enter a Course and Section. Use the Magnifying Glass icon to search the Course Catalog.
Þ Enter a Course number only and click on the i to get a list of section of the course that have already been assigned to a Teacher and Room. You can then click on any of the sections listed to make a re-assignment. You can also click on the check-box to delete/remove that assignment. If the course-section has already been scheduled, then it will not remove the assignment.
Þ Select a Room from the pull-down list. Once a room has been selected, you can click on the magnifying glass to see the Room schedule.
Þ
Click ![]() to process your assignments.
to process your assignments.
Top of the Document Close Window
Step 11B. Run Master Scheduler Builder.
Þ Select <Scheduling System> <Master Schedule Builder>.
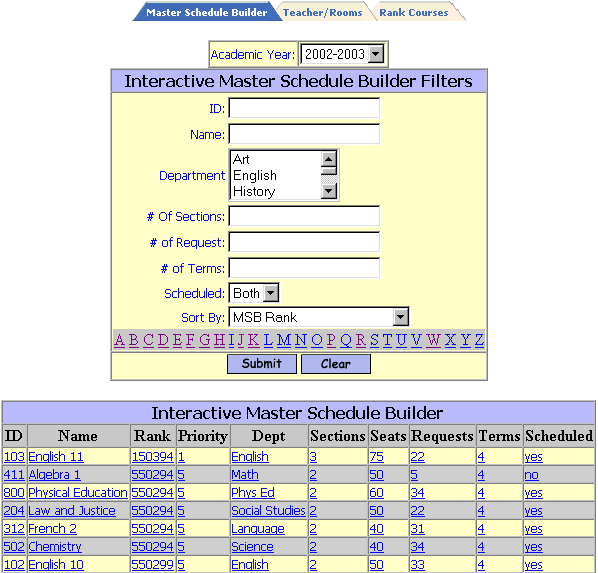
Use the Interactive Master Schedule Builder Filter to select a single course to be manually processed or to review and modify the ranking of your course.
Select a Course
Þ Select a Teacher from the filtering list or re-define the filters to get closer to the course(s) you want.
Sorting Options:
MSB Rank Department/MSB Rank # of Sections
Course ID Department/Course ID # of Requests
Course Name Department/Course Name # of Terms
Priority
ID:
Þ Enter a course ID.
Name:
Þ Enter a course name.
Department:
Þ Select one or more departments.
# of Sections:
Þ Enter the minimum # of requests.
# of Requests:
Þ Enter to minimum # of requests.
# of Terms:
Þ Enter the number of Terms.
Helpful Hint!
If you select a minimum number of sections, requests or terms, then you should sort by that selection also.
Scheduled:
Þ Accept the default of (Both) if you wish to list all courses.
Þ Select No from the pull-down list if you wish to see a list of only those courses that have no sections scheduled.
Þ Select Yes from the pull-down list if you wish to see a list of courses that have at least one section scheduled.
Generally, you would select the period with the fewest number of conflicts.
Þ Select a Section to be scheduled from the pull down list.
Þ Select the meeting times for this section.
Þ Click the period name to assign the section to meet everyday.
Þ Click on the number of conflicts for Day 1 – Quarter 1 for the selected period to assign the section to meet everyday for the 1st Term only.
Þ Click on the number of conflicts for Day 1 – Quarter 1 and Day 2 – Quarter 2 for the selected period to assign the section to meet everyday for the 1st Semester only.
Þ Click the check-box to assign individual meeting times. Uncheck any assignments you wish to cancel.
Þ Click the period name to assign the section to meet everyday, then uncheck days when the course does not meet. This will need to be done if you have a drop-period type rotation.
Reference Links
There are many hyperlinks within the program that allow you to easily reference or modify data that is relevant to your decision making.
Course ID and Name
Þ Click on the Course ID and Name hyperlink at the top of the page to access the <Course Details> page for this course to view or edit the data.
Requests
Conflict Matrix
Teacher Schedule
Room Schedule
Assign Teacher/Room
This hyperlink will appear, if you have not yet assigned a Teacher and a Room to this section.
Course-Section #
This hyperlink will appear for any sections that are already scheduled.
Bucket Fill Section
The “bucket fill” process will fill the first section up to its Max Seats value, if possible, then Max fill the second section and so on.
Example: Course has 3 sections, Max seats = 25/section, total requests =60. With bucket fill, Section 1 gets 25, Section 2 get 25, Section 3 gets 10. With balancing each section get 20 students, ideally.
Þ Check this box if you wish to “bucket fill” each section.
Þ Do not check this box if you wish the program to balance load the sections.
Without “bucket fill”, the program will attempt to balance the number of students in each section selecting students based on their (scheduling difficulty) priority.
Color Codes
Some periods may appear with colors to indicate the following constraints:
Red = Teacher is unable to teach this period:
Yellow = Teacher has a conflict this period:
Orange = Room has a conflict this period:
Þ
Click
![]() to
schedule this section.
to
schedule this section.
Helpful Hint!
1) It is possible that not all students will be scheduled when the last section of a course has been scheduled. Check the list of Requests or the number of Requests to determine if any students are still not scheduled. You can click on the student ID to open their <Modify Schedule> page and hand schedule them or modify their requests.
2) If you are balancing sections, then it is possible that un-scheduled students may fit into a section that was not open to them earlier in the process.
3) When you have completed the process, all students are as fully scheduled as possible and you do not need to run the Student Scheduler program.
Building or Modifying a Master Schedule Manually
Top of the Document Close Window
Step 11C. Build/Modify Master Schedule Manually
Reports are the key to building a Master Schedule, either from scratch or by adjusting an existing schedule. The use of a Scheduling Board is recommended as a tool to help you visualize constraints, conflicts, teacher loads and other problems.
Run Reports
Þ Select <Scheduling System> <Scheduling Report>.
Helpful Hints!
Most reports can be filtered by school. If you have access to more then one school you will have the ability to change the school you want to filter by and click on submit. Your default school will be shown in the drop down when you open the report tab. Once the submit button is clicked the report will be processed and sent to <My Data><My Reports> for you to view.
Selection Criteria: Filtering options can be selected under Enter Selection Criteria. Selections allow the user the ability to limit what information will be listed on the report. Examples: students in second grade only, courses taught by a single teacher or all special education students. If you do not make a selection in a drop down box then all the criteria listed in that box will be included in the report.
If the option to select criteria by Student IDs is available then type a list of student IDs separated by commas into the box to use this feature. If no student IDs are listed then all students will be included, based on other selection criteria.
Sorting: Sorting options can be selected under Enter Selection Criteria. Sorting allows the user the ability to list the information in a certain order. Examples; list students by last name, courses by teacher’s last name, or list by courses in alphabetical order. Sorting options on each report are limited to the list provided.
To: This box allows you to enter an email address or several email addresses of people you want to send the report to. List email address separated by semi-colons.
CC list: This box allows you to enter an email address or several email addresses of people you want to cc a copy of the report to. List email addresses separated by semi-colons.
Priority: This box allows you to set a priority level for the report processor. Priority options are limited to the list provided.
The following reports, in alphabetical order by title, are specific to Master Schedule Building.
Top of the Document Close Window
<Class Lists> Report
Used to: List the student scheduled into each class for the Term(s) selected.
Filter By: Academic Year, From/To Course-Section, Term, Grade Level, Day, Period, Teacher, include Phone #, include SPED flag and Incoming Only.
Sort By: Teacher (program-defined).
Output: Header: Teacher, Course, Room, Term, Schedule. Body: Student ID, Name, YOG, Gender, Homeroom, Phone # (by option), SPED flag (by option), Footer: # of Males, # of Females, Total # of students.
Helpful Hint!
When selecting From/To Course-Section for this report or others with this filter option, you may:
1) Leave the From/To Course ID fields blank to get Class Lists for ALL courses.
2) Enter a single From Course ID without a section and without a To Course Id to get lists for all sections of the Course.
3) Enter a single From Course-Section Id without a To Course to get a single class list.
4) Enter a From Course ID, without section, and a To Course ID, without section, to get class lists for ALL Courses in that range, inclusive.
NOTE: Entering a From Course-Section ID and a To Course-Section ID will not get you every section of every course within the range.
Top of the Document Close Window
<Conflict Matrix> Report
Used to: Determine the number of conflicts (common requests) between one course and any other.
Filter By: one (1), two (2) or no courses. Enter no Course Id and your report will include all courses with all conflicts. Enter one (1) course and get a report of all of the other courses that have conflicts. Enter two (2) courses and get a report of all courses that fall within the range of courses entered.
Sort By: Course ID, Course Name or Combined Requests/Sections.
Output: Header: Course ID, Course Name, Number of Sections, # of Requests and Academic Year. Body: Course ID, Course Name, # of Combined Requests. # of Sections and # of Requests.
<Course Request Tally> Report
Used to: Determine the number of sections of a Course that may be needed by showing how many students in each YOG are requesting the selected Courses. Also to identify any data entry errors.
Filter By: Academic Year, Department, a single Course or a range of Courses, YOG or Include courses with no Requests, week/cycle, include alternatives.
Sort By: Course or Department.
Output: Course ID, Course Name, Department, # of Sections, Maximum number of seat (total in all sections) and # of students requesting each Course by YOG and Total number of requests.
Top of the Document Close Window
<Drop Add Report> Report
Used to: Determine the students who have been dropped from or added to Courses. This report includes changes to requests and scheduled courses. It does not yet include changes based on term modifications of individual students.
Filter By: Academic Year, From/To Date, Student ID#(s), From/To Course, Teacher, Homeroom, Grade Level.
Sort By: Teacher Name, Date of Change or Course.
Output: Teacher, Date, Student ID, Student Name, Course ID, Grade Level, Homeroom and if the change was an Add or Delete.
Top of the Document Close Window
<Master Schedule> Report
Used to: List all or selected courses in the Master Schedule.
Filter By: Academic Year, Term, From/To Course.
Sort By: Course ID, Teacher, Room, Course Type, Period or Department.
Output: Course & Section ID, Course Name, Credits, Max Seats, Filled Count, Terms, Teacher, Room, Schedule and Cycle.
Top of the Document Close Window
<Names of Free Students> & <Student Availability> Reports
Period sorting is not available in the Student Availability Report and the Output is slightly different.
Used to: Determine the names of students who are not scheduled into courses for selected Terms and/or Periods.
Filter By: Academic Year, Student ID(s), Homeroom, Grade Level, Term, Period, Counselor or Include Incoming students.
Sort By: Period, Grade Level, Name or Homeroom.
Output: Student ID, Name, Homeroom, Grade Level, Term, Period and Days.
Top of the Document Close Window
<Number of Free Students> Report
Used to: Determine number of students who are not scheduled into courses for selected Terms. While this report is primarily used to determine Study Hall needs, it can be very valuable in solving bottlenecks in your schedule and creating a better, overall balance.
Filter By: Academic Year, Grade Level, Term.
Sort By: Grade Level/Term (program-defined).
Output: (Text format only) Grade Level,. Term and counts by Day and Period.
<Room Availability> Report
Used to: Determine which Rooms do not have courses scheduled into them for selected terms.
Filter By: Academic Year, Room and Term.
Sort By: Room Code or Room Description.
Output: Room Code, Room Description, Used as Homeroom, Capacity, Term and Days Free.
Top of the Document Close Window
<Room Schedules> Report
Used to: Determine the schedule for the use of the Room.
Filter By: Academic Year, Schedule Type (Period, Summary, Rotation), Room, Term (ignored if Summary Type is selected) or Department.
Sort By: Room.
Output: (MS-Word format only) Room schedule.
Top of the Document Close Window
<Students Requesting a Course> Report
Used to: Determine which students have requested which Courses.
Filter By: Academic Year, Department, From/To Course ID, include alternatives, cycle/cluster.
Sort By: Course ID/Student Name, Course ID/ Student Grade Level/Name, Department/Course ID/Student Name or Department/Course ID/Student Grade Level/Student Name.
Output: Header: Academic Year, Course ID, Course Name and Department. Body: Student ID, Name, Homeroom, YOG, Gender and Grade Level. Footer: Total Males, Total Females and Total Students.
Top of the Document Close Window
<Student Schedules> Report
Used to: Determine the schedules of the students.
Filter By: Academic Year, Schedule Type (Summary, Period, Rotation, Mod, Period & Summary or Rotation & Summary), Student ID, Student Last Name, Homeroom, Grade Level, Term (ignored if Summary Type is selected), Print Total Credits, Print Teacher Names, Print Unscheduled Requests, include Special Needs.
Sort By: Grade Level, Homeroom or Name.
Output: Student Schedule.
Helpful Hint!
When printing Schedules for the entire school, great small batch for processing and printing.
Use different filtering at different times of the year. e.g. Do not print Teacher names on schedules if they are sent out in June.
Top of the Document Close Window
<Teacher Availability> Report
Used to: Determine the names of teachers who are not scheduled into courses for selected Terms.
Filter By: Academic Year, Teacher, Homeroom, Department or Term.
Sort By: Teacher Name or Homeroom.
Output: Teacher ID/Initials, Name, Homeroom, Term and Days/Periods.
Top of the Document Close Window
<Teacher Schedules> Report
Used to: Determine the schedule for the Teacher.
Filter By: Academic Year, Schedule Type (Period, Summary, Rotation or Mod), Teacher, Homeroom, Grade Level or Term (ignored if Summary Type is selected).
Sort By: Department or Teacher.
Output: Teacher schedule.
Top of the Document Close Window
<Unscheduled Requests> Report
Used to: Determine students who have requested Courses that have not yet been scheduled.
Filter By: Academic Year, Student ID, From/To Course, Homeroom or Grade Level.
Sort By: Grade Level, Homeroom or Name.
Output: Student ID, Name, Homeroom, Gender, Grade Level, Course ID and Name.
Top of the Document Close Window
Define the Master Schedule
Þ Select <Scheduling System> <Course Catalog> <Course Details>.
Þ Click on the Schedule hyperlink for the Course-Section you wish to Schedule.
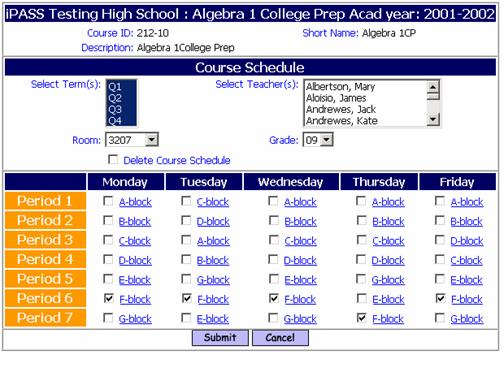
Select Term(s):
Select Teacher(s):
Room:
Grade:
Delete Course Schedule:
Helpful Hint!
If you checked Yes for “Use Detailed Schedule” (See Step #9) on the Course Details page, then the options described above will need to be defined for each Period/Day that the course meets. See further information about this Detailed Scheduled option are included in Step 15. Scheduling Study Halls.
Assign Meeting Times:
Top of the Document Close Window
Step 11D. Run Student Scheduler
How the i PASS Scheduler Works/
Before you begin to schedule your students, remember that the Scheduler can only process the data that it has been given. The success of any scheduler and the processing time will always be dependent upon the quality of the data which has been entered. Garbage In = Garbage Out
Every effort should be made to insure that the data being used by the Scheduler is as complete and accurate as possible.
IMG - Support is always willing to work with you to answer your questions, review your procedures and assist whenever possible. Call or e-mail us at ipasssupport@harriscomputer.com.
After you have selected the students to be processed and defined the additional criteria (e.g. "Clear Prior Schedules"); the Scheduler will begin processing the selected students as follows:
1. The Scheduler will review the requests for each student and assign to each student a ranking priority for processing based on the following:
Þ The Grade Level of the student. If you have selected more than one Grade Level to be processed, then the Scheduler will determine the priority based on the <Grading System><Maintenance><Grade Scheduling Weights>.
Þ The level of difficulty to schedule the student. A student requesting 5 singleton courses is more difficult to schedule than a student selecting 5 doubleton courses. Singletons, doubletons, etc. are determined by the value in the "Number of Sections" field in the <Course Catalog> <Course Details> for each course being requested. Also a student requesting 7 courses is more difficult to schedule than a student requesting 5 courses.
If a tie exists, then the students are processed in random order.
2. Once the Scheduler has selected a student to be processed, the Scheduler will prioritize the individual course requests for that student. The most difficult course to schedule will be attempted first.
The difficulty of scheduling a course is dependent on the following factors, in order:
Course Catalog Priority – Priority 1 first
Number of Section – Singletons first
Number of Terms – Full courses first
Number of Periods – Most periods first
NOTE: The scheduler is "dynamic". It will look at the status of the requested courses at the time it attempts to schedule the student. If a student has requested a tripleton (course with 3 sections) and two of those sections are closed (full, no seats available), then the Scheduler will consider this course to be a singleton request for this student and attempt to schedule it before any doubletons or other tripletons.
3. The Scheduler will then attempt to assign the student to an available section of each course requested. It will juggle the available sections whenever possible in order to place another course request.
4. Given the choice of more than one section, the scheduler will place the student in the course with the most seats available at the time, in order to balance the seating among the sections of the course.
5. The Scheduler will stop the processing of the student and move on to the next student when:
Þ All requested courses that could be scheduled have been assigned a section.
Þ All combinations have been attempted.
Þ The "Maximum Elapsed Time" has been reached.
6. The scheduler will proceed to the next student. Since the students were prioritized at the beginning of the process, the Scheduler will not go back and try to change the schedules of students who have already been processed in an attempt to schedule the student currently "at bat". This option, sometimes called "Shuffling" is not available in i PASS.
Top of the Document Close Window
Grade Scheduling Weights
This option allows you to select which Grade Levels have priority in the Student Scheduler program if you select more than one Grade Level to be processed.
Þ Select <Scheduling System> <Scheduling Maintenance> <Grade Scheduling Weights>.
Weight:
Þ Select a weight from 1-20 for each Grade Level. Students in a Grade Level with a Scheduling Weight of one (1) will be processed before students in a Grade Level with a Scheduling Priority Weight of two (2) and so on.
Þ Select the same Weight for all Grade Levels and students will be processed in the order determined by the program regardless of their Grade Level.
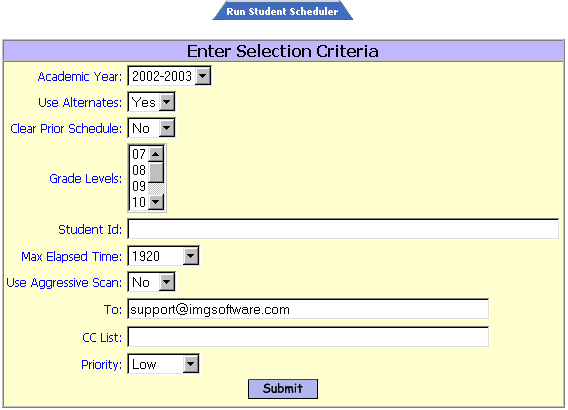
Academic Year:
Þ Select the correct Academic Year from the pull-down list to define the coming year’s schedule parameters. BE SURE YOU HAVE DEFINED THE CORRECT ACADEMIC YEAR.
Use Alternates: <No>
Þ Select the default of No and Alternates will not be processed.
Þ Select the default of Yes and if any original request cannot be scheduled, then it will be replaced by the alternate and the program will attempt to schedule the alternate.
NOTE: It is strongly recommended that you DO NOT select Yes for this option.
Clear Prior Schedules: <No>
Þ Select the default of No and previously scheduled courses will not be re-assigned.
Þ Select Yes if you have made any meeting time changes to ANY courses.
NOTE: Courses checked as locked in a student’s <Modify Schedules> summary schedule will not be changed regardless of the setting of this option.
Grade Levels:
Þ Select one or more Grade Levels to be processed.
NOTE: If you are selecting more than one Grade Level, then be sure that you have defined <Grade Scheduling Weights> if you wish to prioritize the processing by Grade Level.
Student ID:
Þ Enter a string of Student ID numbers (separated by commas, no spaces) to get a specific selection list of students to be updated.
Þ Leave the field blank to select students based on other criteria.
Max Elapsed Time: <1920>
Þ Accept the default of 1920 seconds (32 minutes) for the scheduler to process a single student.
Þ Enter a different number of seconds as the maximum processing time per student.
Use Aggressive Scan: <No>
The Aggressive Scan will process students without regard to balancing. This process is not recommended in normal situations.
Þ Accept the default of No to use the normal scheduling algorithm.
Þ Select Yes to use the Aggressive Scan option.
Þ
Click
![]() to process.
to process.
Top of the Document Close Window
Step 12. Analyze the Results & Modify the Master Schedule
In addition to re-running the reports described in Step #11C, there are four (4) reports produced automatically every time you run the Student Scheduler.
Top of the Document Close Window
Scheduler History:
Þ Select <Scheduling System> <Scheduler History>.
All Scheduling Runs will be listed, until deleted, with the date, Start time, End time, Total run time, Success status and Reason.
Þ Select the Run you wish to view.
The report will give you a Summary of the Run with totals and percentages for the run as a whole and for each Grade Level. You will also see the Details of each student, in the order processed, of what was done in the process of scheduling the student.
Student Scheduler Reports:
Three (3) reports are generated automatically as a single document.
Þ Select <My Data> <My Reports> <StuScheduler (RTF format)>.
<Student Rejection Tally> Report
Each student is listed with the courses they were rejected from and the reason they were rejected from each section of the requested course. The reasons are; a conflict and the report indicates the course and section in conflict; or that there were no seats available; or that there were no sections defined.
<Rejected Courses> Report
Each Course that was rejected is listed with each section, the max seats and the filled counts.
<Course Rejection Tally> Report
This is probably the most important of the three (3) reports.
Each Course that was processed is listed with the Course ID, Course Name, # of Sections, # of Rejected Requests, # of Requests and Percent (%) Rejected.
Helpful Hint!
You should look for the following indicators:
Þ Courses where more than 10% of the students requesting the course are being rejected. The problem with these courses is likely to be in the Master Schedule and not in the individual students’ course requests.
Þ Too few sections.
Þ Too many requests. This may be acceptable if you are using the “Scheduler” to decide which students cannot be scheduled and must select another course.
<Number of Free Students> Report
A description of this report is repeated here for emphasis.
Used to: Determine number of students who are not scheduled into courses for selected Terms. While this report is primarily used to determine Study Hall needs, it can be very valuable in solving bottlenecks in your schedule and creating a better, overall balance.
Filter By: Academic Year, Grade Level, Term.
Sort By: Grade Level/Term (program-defined).
Output: (Text format only) Grade Level,. Term and counts by Day and Period.
Use this report to check overall balance in your Master Schedule.
Example: A large number of Juniors are free period 3, move a course or course-section into period 3. Very few Juniors are free period 5, move a course or course-section out of period 5.
Analyze, Amend and Repeat.
Review your results and make modifications to your Master Schedule and Student Requests and re-run the Student Scheduler. At some point you will need to determine that nothing more can be done with the Master Schedule to improve your results and you will need to deal within individual student requests.
Top of the Document Close Window
Step 13. Modify Student Schedules.
Þ Select <Scheduling System> <Modify Schedules>.
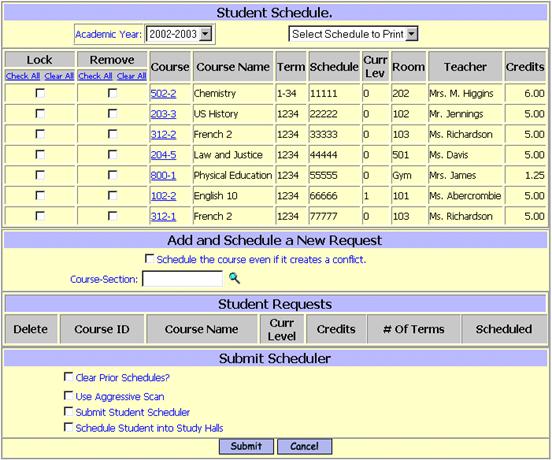
Modify requests, change course levels, replace unscheduled requests with alternates until students are fully scheduled.
IMPORTANT NOTE: Modifying a student’s schedule DOES NOT consider Linking, Teaming or cycle/cluster designation
Top of the Document Close Window
Step 14. Scheduling Variations – Linking, Cycles/Clusters.
I. Explanation of Linking
i PASS will allow you to link courses to courses and/or course-sections to course-sections in the <Course Catalog> <Course Details>.
Linking is used to insure that the same groups of students are in the same courses or the same courses and sections for each of the courses or courses and sections in the link chain.
NOTE: Linking is only a factor when running the Scheduler, either from the <Scheduling System> or using the checkbox to at the bottom of the student’s <Schedule Summary> page to “Submit Student Scheduler”, if that right is available to the User. It is NOT considered when modifying an individual student’s schedule, or using the i PASS Master Schedule Builder.
You may or may not add the linked course to a student’s request. It will not be added automatically to the students’ requests list.
Course linking assignments are shown in the <Course Catalog (Scheduling)> report.
Linking Course to Course:
Linking Course to Course means that any student requesting a linked course, the Scheduler will attempt to also schedule the second course. They may or may not get scheduled into either or both courses. The scheduler will place the student into the best possible section of each course, if possible. The student may or may not be in the same section for the second course and may or may not be with the same students in the second course.
This option also allows you to Link courses that do not have the same number of sections, such Physical Education and Health.
Þ Select <Scheduling System> <Course Catalog> <Course Details>.
Þ Select a Course using the Course Selection Filters.
Linked Course:
Þ Enter the course you wish to link to this course. Use the Magnifying Glass icon to search the Course Catalog.
Þ
Click ![]() to save your changes.
to save your changes.
A new column titled Linked will appear in the Course Sections area near the bottom of the Course Details page with a blank value and a pull-down box.
Leave these boxes blank if you are linking course to course.
NOTE: Course “B” does NOT HAVE TO BE linked back to Course “A”. You may identify that back-linking if you wish for clarification.
Any number of courses may be linked in a chain.
Linking Course and Section to Course and Section:
Linking Course and Section to Course and Section means that any student requesting a linked course, the scheduler will attempt to place the student into the same section of both courses. If it is not possible to place the student into both, then neither will be scheduled.
Linked courses in this case MUST have the same number of sections and MUST have the same number of seats in each of the sections.
Þ Select <Scheduling System> <Course Catalog> <Course Details>.
Þ Select a Course using the Course Selection Filters.
Linked Course:
Þ Enter the course you wish to link to this course. Use the magnifying glass to search the Course Catalog.
Þ
Click
![]() to save your changes.
to save your changes.
A new column titled Linked will appear in the Course Sections area near the bottom of the Course Details page with a blank value and a pull-down box.
Linked:
Þ Enter the section number of the Linked Course that each section is to be linked to.
Linking MUST be on a one-to-one basis when linking courses and sections. Each course/section can be linked to one and only one course/section. While it is easier to track and identify the linking if section #1 of the first course is linked to section #1 of the second course and section #2 of the first course is linked to section #2 of the second course and so on; this pattern is not required by i PASS.
Helpful Hint!
You may wish to number your sections so that the section number, or some part of it, identifies the term that the section meets when linking term courses together. In this case Section 1, which meets Term 1 would be linked to Section 2 of the second course which meets Term 2 and then Section 2 of the second course would be linked to Section 3 of the third course, which meets Term 3 and so on.
EACH and every section of Course "A" MUST be linked to
one and only one section of Course "B", etc.
II. Explanation of Cycles/Cluster (AKA Weeks, Teaming, Academies, etc.)
This grouping of students has traditionally been done by the Massachusetts regional technical schools to identify students and courses in their alternating “week” schedule where half of the student body were in Academic classes while the other half were in their Technical or Shop classes.
The ability of i PASS to meet this situation has been expanded to allow for the identification and scheduling of students in Academic clusters (e.g. Middle School Teams, Grade 9 Academies, etc.).
1. Define your school as a “Technical School”.
Þ Select <Administration> <School Resources> <School Profile>.
Technical School:
Þ Select Yes to use this feature.
Þ
Click
![]() to save your changes.
to save your changes.
2. Define your Cycles, Clusters, Teams, etc.
Þ Click the Cycles/Clusters link or EDIT.
Þ Enter the Team or Cluster or Week Codes and Descriptions.
Þ
Click
![]() to save your changes.
to save your changes.
NOTE: You must also identify a cluster that would identify sections open to all students. This cluster could be called “All”.
3. Define the Cycle/Cluster for each section.
Þ Select <Scheduling System> <Course Catalog> <Course Details>
A new set of fields titled “Cycle” is now available in the Course Sections area.
Cycle:
Þ Select Team/Cycle/Week name from the pull-down list to limit enrollment to the section to only those students on that team, etc.
Þ Leave the field blank if the Section is open to all students or assign your “All” code.
Þ
Click ![]() to save your changes.
to save your changes.
4. Assign students to Cycles/Clusters.
Þ Select <Biographical System> <Mass Update Student>
Use this program to assign students to the correct Team/Cluster using the “Week/Cluster” field.
Top of the Document Close Window
Step 15. Scheduling Study Halls
A separate Study Hall Scheduler exists on your menu for mass loading Study Halls and a new procedure for defining Study Halls.
1. Study Halls must be defined in <Scheduling System> <Course Catalog> <Course Descriptions>.
Add the Study Hall Course(s) to your Course Descriptions.
The Course ID can be alpha-numeric.
Helpful Hint!
Define your Study Halls with a first character of “S”, followed by whatever alpha or numeric combination best identifies the course. Example S1 = Study Hall Semester 1. A single course for each semester may now be all that you will need. You will need to create other courses, if your Study Halls are, in some manner, grade level specific, i.e. a Senior Study and an underclassmen Study.
Use the “Move Courses to Course Catalog” option to copy those Study Hall courses into the Course Catalog for 2004-2005.
See Step #6. Create New Courses & Move to Course Catalog for details of these programs.
2. Study Halls must be defined in your <Scheduling System><Course Catalog> <Course Details>.
Use the following <Scheduling System><Reports> to determine the number of study halls you will need and the teacher and room assignments. These reports are described in Step #11C of this document
<Number of Free Students> <Student Availability>
<Names of Free Students> <Teacher Availability>
In the Course Details:
1. You MUST define the Study Hall(s) as Academic Type = “Study Hall”.
2. Set “Print on Transcript” = No, unless you are grading the “Study Halls” and want them to appear on Transcripts.
3. Leave the From/To Grade Level fields Blank if all students from any Grade Level can be assigned to the Study Hall sections.
4. Define a Grade Level range, 09 to 11 or 12 to 12 for example, if you which to restrict which Grade Levels are assigned to this course. You may leave the Grade Level range values blank if the Study Hall is open to students in any Grade Level.
5. NEW! – Define the Study Hall course to “Use Detailed Schedule = YES”.
Þ Study Halls also need to be defined with a Department in order to have them appear on the Modify (Student) Schedules – Master Schedule filtering and on the Master Schedule print-out. Use or create a Department of “Administration” or “Study Hall”.
6. Define multiple sections based on the maximum number of rooms that you will need any one period, on any one day. If the most rooms you will need on any one period, on any one day is three (3), then you will need to create three (3) sections for this Study Hall course for the Grade Level range specified.
7. Define the Max Seats for each section. If you are using a location with larger capacity rather than classrooms (i.e. Lecture Hall, Cafeteria, Auditorium, etc.) then you will need to define a separate section.
3. Define the Schedules for each section.
Using the Detailed Schedule option, define the teacher and room assignments for each period, each day, each term.
4. The Study Hall Scheduler will:
1. Attempt to place a student in the same room & teacher, if possible, then in the same room, if possible, then with the same teacher, if possible.
2. Balance the placement of students if multiple sections are available.
Note: The Study Hall Scheduler will take time to do the processing.
5. Modify Student Schedule
You may add and schedule Study Halls manually, as you do regular courses.
When a Study Hall is removed, it is removed completely. It does not remain as an unscheduled request.
There is also an option, check-box at the bottom of the page, to fill a student’s schedule with Study Halls into any existing holes.
5. The Filled Count will be displayed for each period, each day, each term on the <Course Details> section schedule page and not on the course details page.
7. <Scheduling System> <Reports> <Class Lists> for Study Halls will be printed by day and by period.
Top of the Document Close Window
Step 16. Middle School & Elementary School Scheduling
i PASS has the flexibility to be used to generate student schedules for Middle Schools and Elementary School. In some case the schedules are used only to generate class lists for grading purposes. It some schools they are used to produce student schedules so that students know where they need to be throughout the day and staff can locate them easily. In other schools, meeting times are only used for specialist courses.
For the most part, a Master Schedule is created manually. However, there are features within i PASS to help with various scheduling functions.
1. Rotation by GL
As described in Step #5. Define/Modify your Rotation, you can define a different “Bell Schedule” for each Grade Level and produce schedules which reflect those definitions.
Þ <Scheduling System> <Maintenance> <Rotation by GL>.
2. Mass Load Schedules & Requests
This program, described in Step #7B. Mass Load Student Course Requests, can be very helpful in adding requests or directly scheduling students.
Þ <Scheduling System> <Requests> <Mass Load Schedules & Requests>.
NOTE: If you are using this program to directly schedule students, then be sure to check the report, which is automatically generated, after each course is processed. Do Not start the scheduling of another course until after the first process is finished.
Helpful Hint!
Assign students to a Team course that has No Meeting Time to use as a base for loading other courses.
You can also use the Scheduler to create your Teams.
You could assign students to a temporary Homeroom to use as a base and later, very easily, clear that Homeroom and <Mass Update> them into their actual Homeroom.
You could use the Mass Load Homerooms program to create your Teams as well.
3. Section Names that reflex a Homeroom or Team
The Names of Section can be alpha-numeric to indicate a Team or Homeroom. See Step #9. Edit the Course Catalog Details.
Þ <Scheduling System> <Course Catalog> <Course Details>.
4. Multiple block “Core” courses
Course can be created with a generic title of “Core” or “Team” and be assigned to meet multiple periods in the schedule in various combinations of double or triple periods, for example. Specialist course can then be created with the specific periods and times that they meet. Academic course are then created with No Meeting Time to get your class lists for grade reporting.
5. Teaming can be absolute or flexible.
With the use of the Cycle/Cluster options for course, you can isolate students within a single section or allow the scheduler to randomly mix students within a Team of Homerooms, or within a Grade Level for Specialist courses.
Step 17. Print Reports
See Step #11C for descriptions of most Scheduling Reports Including:
The following reports are also available:
Top of the Document Close Window
<Course List> Report
Use to: Allow teachers to print only their own class lists and not the entire school or selected teachers.
Filter By: Academic year, Course and Teacher.
Sort By: Student Name.
Output: Student ID, Name, Grade Level, Gender, Homeroom, Phone Numbers and Counselor.
Top of the Document Close Window
<Class List Misc.> Report
This report provides the additional option to include student miscellaneous data for each student from one or more of the misc. fields defined by the district.
Used to: List the student scheduled into each class for the Term(s) selected with additional Miscellaneous information.
Filter By: Academic Year, From/To Course-Section, Term, Grade Level, Day, Period, Teacher, include Phone #, include SPED flag and Incoming Only and Misc. field(s).
Sort By: Teacher (program-defined).
Output: Header: Teacher, Course, Room, Term, Schedule. Body: Student ID, Name, YOG, Gender, Homeroom, Phone # (by option), SPED flag (by option), Misc. Fields (by option). Footer: # of Males, # of Females, Total # of students.
Top of the Document Close Window
<Exploratory HR List> Report
Used to: Lists students by Homeroom and indicates the next shop exploratory program with title and room.
Filter By: Academic year, Grade Level, Homeroom, Cycle, and Include Incoming.
Sort By: Name, Grade or Homeroom.
Output: Student ID, Name, Course and Room number.
Top of the Document Close Window
<Ethnicity by Course> Report
Used to: Identifies the number of Males and Females in each Grade level in each ethnic group.
Filter By: Academic year, Grade Level, From/To Course-Section, Department, Course Type, Race, Sped Only Flag, Break down Grade Level.
Sort By: Course ID or Course Name.
Output: Course ID, Course Name, Breakout of Gender, Gender Total, and Breakout of Ethnicity codes by Gender.
Top of the Document Close Window
<Calculate Filled Count> Report
Used to: Calculate and update the fill counts for scheduled courses.
Filter By: Academic year, Enrolled Only, and allows you to Update Fill Counts Yes/No.
Sort By: Course ID, Course Name, Filled Count or Difference.
Output: Course ID, Course Name, Maximum, Fill, Actual Count and Difference.
Top of the Document Close Window
Step 18. Career/Technical Education Schedules.
I. Exploratory Programs
Exploratory programs in our Massachusetts Career/Technical schools allow Freshmen to spend time in all or some combination of Career/Tech courses during the first part of their Freshmen year.
i PASS has been used in several different ways to schedule these students and in some cases grade them and keep attendance.
To create a unique schedule, the Exploratory program is setup in the next Academic Year where a different schedule matrix can be defined based on the number of programs each student will experience. This separate school year provides for separate grading in addition to the separate scheduling. However, all of this data is removed from ipass after the program is complete and the student is placed in their selected Career/Technical program.
When students explore fewer than all programs offered, then the <Scheduling System> <Requests> <Add/Modify Requests> program is used with the parameters set to assign priorities to allow the student’s choices to be ranked. The Scheduler can then be used to attempt to schedule them into their first choice before scheduling them into their second choice and so on.
II. Alternate Week Programs
For the most part, Career/Technical Courses are scheduled as No Meeting Time courses since they meet all day without regard to rotations, bell schedules and time blocks.
Is it possible, however, to create an additional “day” in the schedule cycle to provide for meeting time course when the students may come out of their Career/Technical course to attend a scheduled related course, special needs course, MCAS support course or any academic course.
Sample Scheduling Timeline
WHAT WHO WHEN
Review Course Offerings Principal November
& Update for Next Year Department Heads
Curriculum Committee
Finalize Course Offerings School Committee Early January
Print "Program of Studies" Guidance Mid-January
& Course Selection Forms
Copy Course Catalog Data Processing February 1st
(and Master Schedule?)
Data Entry of Student Data Processing Last 2-weeks
Requests in February
Analysis of Requests: Principal March
# of Sections Needed, Department Heads
Request Verification, Guidance
Modify Requests
Build Master Schedule Scheduler Early April
Run Scheduler - Scheduler Mid-April thru
Revise & Refine Mid-May
Print Reports Data Processing Late May
Revise Schedules Guidance Late June
(Failures/New Students)
Define & Schedule Study Scheduler Early August
Halls
Print Final Reports Data Processing Late August