Biographical System
This module allows you to register new students, modify, delete demographical data on students, run biographical reports, and perform various mass updating and enrollment procedures. Consistent with all i PASS modules, there is set of maintenance tables that drive the system and they must be setup and defined by the school and/or school district.
Please be aware that all tab and Menu descriptions in the i PASS environment are customizable and may vary from the tab or menu descriptions displayed in this documentation. Please see your local i PASS super user or contact IMG support for further clarification.
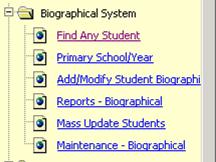
Figure 1
Find Any Student
Find any student screen will locate all students in your district regardless of their school assignment or their enrollment status. Use one of the following to narrow your search.

Figure 2
LASID:
Þ Enter the student’s LASID you want to search for.
SASID:
Þ Enter the student’s SASID you want to search for.
Student ID:
Þ Enter the student’s ID you want to search for.
Last Name:
Þ Enter the student’s last name you want to search for.
First Name:
Þ Enter the student’s first name you want to search for.
Grade Level:
Þ Select the appropriate grade level from the pull down box. Initial setup required under <administration folder> <school resources> <grade level>.
Home Room:
Þ Select the appropriate Home Room from the pull down box.
Area Code:
Þ Enter an Area Code.
Exchange:
Þ Enter a Phone Exchange.
Last 4:
Þ Enter the Last 4 digits of a Phone Number.
Street Number:
Þ Enter a Street Number.
Street:
Þ Enter a Street Name.
Address #2:
Þ Enter data that would be found in the Address #2 field.
City:
Þ Enter a City.
State:
Þ Enter a State.
Zip:
Þ Enter a Zip Code.
Sort By:
Þ Select the appropriate sort option from the pull down box.
§ By Student ID
§ By Last Name
§ By Grade Level
§ By Homeroom
§ By LASID
§ By SASID
Þ
Click the ![]() Button to submit your Search criteria
Button to submit your Search criteria
Þ
Click the ![]() Button to Clear the Search Criteria Screen
Button to Clear the Search Criteria Screen
Find Any Student Output:
After you Submit your Search Criteria a list of students fitting those criteria will be available on the screen.
Þ Listed will be the student’s:
§ ID Number
§ Name
§ Grade
§ Homeroom
§ LASID
§ SASID
§ Primary School
§ Enrollment
§ Deleted Status Yes/NO
§ The Data meeting your Search Criteria
Þ
Click on the 2212![]() Id
number to see the student’s information.
Id
number to see the student’s information.
Helpful Hints:
If you have security access to Can Edit ANY Student on Find Page then you will be able to access the student’s information as well as edit the student’s information. If you have security access to Can View ANY Student on Find Page then you will only be able to view the student’s information on each Tab.
Add/Modify Student Biographical
These pages allow users to add/modify student data on any tab(s) of information made available to the user type. The i PASS district super user using the i PASS <Security System> and <Menu System> can control access to these pages.
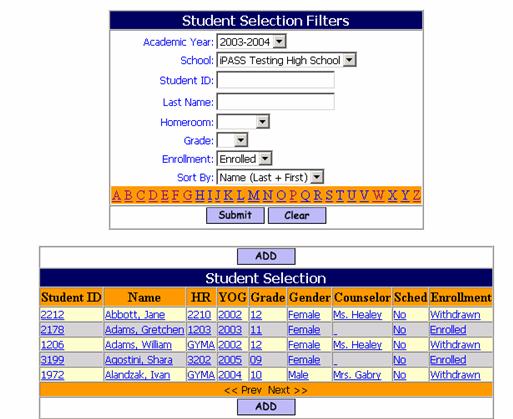
Figure 3
Þ Click on <Biographical System> <Add/Modify Student Biographical>
Þ
Click on
the ![]() button to add a new
student.
button to add a new
student.
Helpful Hint!
When you register a single student who is new to the District or who was not previously entered into i PASS, a District Enrollment Record must also be created for that student (see Enroll a Single Student). A student can be registered at any time. “Registration” meaning to enter a student’s Name, Grade Level, Gender, Primary School, have a computer generated Id# assigned and whatever other pertinent biographical data is available. A “Registered” student can have course requests entered and be scheduled into classes.
Once a student is “Registered”, then an enrollment record must be created to complete the process. Upon completion, the student will be included in your schools total enrollment figures and track attendance, etc.
Be sure to instruct users to maintain your desired consistency when entering data.
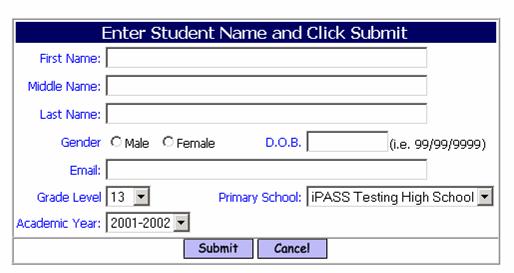
Figure 4
First Name:
Þ Enter the student’s first name
Middle Name:
Þ Enter the student’s middle name
Last Name:
Þ Enter the student’s last name
Gender:
Þ Select male or female
Date of Birth:
Þ Enter the student’s Date if Birth.
Email Address:
Þ Enter the student’s email address
Grade Level:
Þ Select the appropriate grade level from the pull down box. Initial setup required under <Administration> <School Resources> <Grade Level>.
Primary School:
Þ Select the appropriate primary school from the pull down box. Initial setup required under <Administration> <School Resources> <School Profile>.
Academic Year:
Þ Enter the Academic Year that the student is entering.
Submit:
Þ Select this button to save the data. The system will then assign a computer generated student ID # and allow you to continue entering biographical data on this student beginning with the <Profile>Tab.
Helpful Hints!
If a record already exists based on a match of First Name, Last Name and Date of Birth, then a screen will appear displaying the data of the existing student and give you the option to cancel the new entry, if it is the same students or to accept the new entry as a Non-Duplicate record.
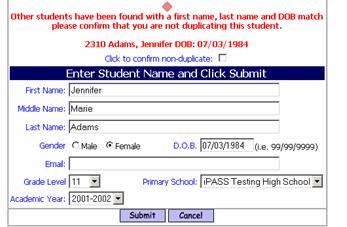
Figure 4a
<Profile>Tab
The Profile Tab is the main screen for each student.

Figure 5
Student ID Number:
Þ This will display the ID Number assigned when the student was registered.
First Name:
Þ This will display the First Name entered when the student was registered.
Suffix:
Þ This is used to hold information such as Jr. Sr. III.
Middle Name:
Þ This will display the Middle Name entered when the student was registered.
Gender:
Þ This will display the Gender entered when the student was registered.
Last Name:
Þ This will display the Last Name entered when the student was registered.
Preferred Name:
Þ Enter nickname for the student
Image File:
Þ Enter the name of the students picture file. It must be in JPG or GIF file format. Note: The file itself must be loaded in the appropriate i PASS directory (see your local i PASS system administrator). The images can be mass loaded (see <Biographical System>< Maintenance - Biographical><Assign Student Photos>).
Year of Graduation:
Þ Select year of graduation as defined under <Administrative System> <School Resources> <Grade Levels>
Grade Level:
Þ Select year of graduation as defined under <Administrative System> <School Resources> <Grade Levels>
Town of Residence:
Þ Select Town student lives in as defined under <Biographical Maintenance><Town Codes>
Previous School:
Þ This will display the last school listed in the enrollment records for this student.
Primary School:
Þ The Primary School is define within the enrollment records and will be displayed here.
Homeroom:
Þ Select student home room as defined under <Administrative System><School Resources><Room Catalog>
Counselor:
Þ Select student councilor as defined under <Administrative System><School Resources><Teachers and Staff> click on the person and assign the Job Type of Counselor
Next Year:
Þ Select a Next Years School. This allows the next year’s school access to the student for scheduling.
Next Homeroom:
Þ Select a Next Year Homeroom. This allows you the ability to start planning Next Year’s Homerooms before the end of the year.
Next Grade Level:
Þ Select a Next Year Grade Level. This allows you the ability to start planning for Next Year’s census before the end of the year.
Locker:
Þ Select student locker number as defined under Locker System
Email:
Þ Enter student’s email address
Date of Birth:
Þ Select student’s date of birth and students age will calculate automatically
City of Birth:
Þ Enter City of Birth for the student
State of Birth:
Þ Enter State of Birth for the student
Country of Birth:
Þ Select a Country of Birth for the student from the drop down list of Countries
WARNING!
You Must “Submit” any additions or modifications on this page before adding or modifying guardians or else your data will be lost.
Guardian Information:
Þ
Click on the ![]() button to add Guardian or
Contact information for the student.
button to add Guardian or
Contact information for the student.
Þ
Click
on the ![]() button
next to Guardian ID.
button
next to Guardian ID.
Þ Search for the Guardian to see if they already exist in the database. You can search by Last Name or First Name. (See Figure 6)

Figure 6
Þ When you find the Guardian click on there ID number and their information will fill the Guardian Information Screen
Þ If the Guardian is not listed there then add the necessary information to the screen
Þ
Click the ![]() button
at the bottom of the page
button
at the bottom of the page
Resident Address of Student:
Þ Add the student’s Resident Address information
Þ
Click the ![]() button
at the bottom of the page
button
at the bottom of the page
Mailing Address of Student:
Þ Add the Parents name as you want it to appear in a letter salutation or on a mailing label.
Þ Add the student’s Mailing Address
Þ
Click the ![]() button
at the bottom of the page
button
at the bottom of the page
Phone Numbers of Student:
Þ Enter the student’s Home Phone Numbers and a student’s personal Cell Phone Number
Þ Click on the unlisted check box to indicate if a student’s home phone number is unlisted
Þ
Click the ![]() button
at the bottom of the page
button
at the bottom of the page
Delete Student Record:
Þ Check the box to indicate that this student’s record should be deleted. Only delete students who never attended a day of school in your district.
Þ
Click the ![]() button
at the bottom of the page
button
at the bottom of the page
<Enrollment>Tab
Once a student is registered, then an enrollment record must be created to complete the process. Upon completion, the student will be included in your schools total enrollment figures and also be available to track attendance, etc. (See Figure 7)
Enrollment means to define a date when the student is first going to be present or is first expected to be present in your District and/or Building for the current or upcoming Academic Year.
Each student will, at the very least, have one (1) District Enrollment Record, one (1) School Building Enrollment Record and one (1) Academic Year Enrollment Record.
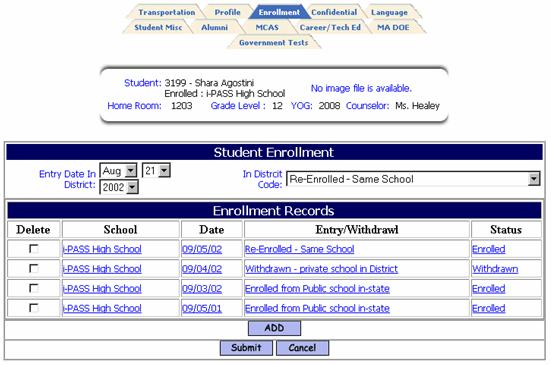
Figure 7
Enrolling a Single Student
Þ Go to <Biographical System> <Add/Modify Student Biographical> <Enrollment> tab.
Þ
Click the ![]() button. (See Figure 8)
button. (See Figure 8)
Helpful Hint!
Do not modify a student’s existing record, you must click the add button and create a new entry or withdrawal enrollment record for the student.
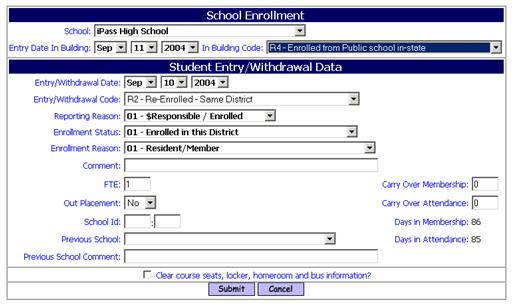
Figure 8
After registering a new student you may:
Create their Enrollment Record immediately for the first day that you expect them to be in attendance in your building;
Helpful Hint!
It is strongly recommended that you do not enter an Enrollment Record for the upcoming Academic Year at the time you are registering a new student (into Kindergarten or Pre-school for example) if it is prior to your mass enrolling all students for a new school year. This option is suggested for students who will be present in the next day or two for the current Academic Year, although it may be better to wait until they actually show up.
1) wait and enter their Enrollment Record when they first arrive in your building
2) mass enroll them later with other students (see Mass Enroll Students).
If the student is not Enrolled immediately upon registering them, then access to any of their information requires that you select the None option for Enrollment on the Student Selection Filter page.
|


Figure 9
District Enrollment Date
If the student is new to your District and School:
This date should be the date the student was first in attendance in your District. This date is not used or reported at this time, but i PASS will be developing a report that uses this date to determine how long a student has been enrolled in your District (basically for MCAS and other test result analysis along with how long a student has been in your building).
If the student is transferring in from another school within your District:
Þ Do not change this date.
Þ
Click ![]() to save
your changes
to save
your changes
Add a new Enrollment Record
NOTE: The procedures for this Step are the same regardless of whether the student is Enrolling in your school from inside or outside of your District.
Þ
Click ![]() to access a new
record
to access a new
record
School Enrollment:
These fields deal with the student’s Enrollment Record, in this case entry, into your School Building.
School:
Þ Accept the default of your default school.
Þ If your District has a central Registration and Enrollment Office, then this value may need to be changed to show the name of the school the student will be attending.
Entry Date in Building: <today’s date>
Þ Click on the default date of today or enter the date that the student was first in attendance in your building.
In Building Code:
Þ Select the correct Entry Code from the pull-down list.
Student Entry/Withdrawal Data – (Academic Year Enrollment)
Þ These fields deal with the student’s Enrollment Record, in this case Entry, into your School Building for the current Academic Year.
Entry/Withdrawal Date: <today’s date>
Þ Click on the default date of today or enter the date that the student was or is expected to be first present in your school for this Academic Year.
Entry/Withdrawal Code:
Þ Select the Entry Code from the pull-down list.
Reporting Reason:
Þ Select the correct Code from the pull-down list.
Enrollment Status:
Þ Select the correct Code from the pull-down list.
Enrollment Reason:
Þ Select the correct Code from the pull-down list.
Comment:
Þ Enter any comment you wish, such as where the student came from.
FTE (Full Time Equivalency): <1>
Þ Accept the default of one (1) if the student is a full-time student and enrolled 100% of the time in your school. Enter the decimal value that represents the amount of time a part-time student is enrolled in your school. This field is not based on a student’s possible participation in Special Education.
Out Placement: <No>
Þ Accept the default of No if this student is not Out-Placed to a facility out of your School and/or District as defined by your District and the DOE.
School Id:
Use this for only Out of District Students.
Þ Enter the state defined code for the School they are attending.
Þ All enrolled students should have this field blank.
Helpful Hint!
School ID will come directly from the District and School Profiles located in <Administration> <District Recourses><District Profile> and <Administration> School Resources><School Profile>
Previous School:
Þ Select the school from the pull down list of Out of District Schools that the student is coming from or leave the field blank if they are coming from a school in your district.
Previous School Comment:
Þ Enter the name of the Previous School if it is other than a school in the pull down list.
Helpful Hint!
You may add additional Out of District Schools in <Administration><School Recourses><School Profile>. We suggest that you only list schools that regularly send students to your school. Create generic Out of District School named “See File” for other schools and identify the school on the “Pervious School Comment” field.
Carry Over Membership:
Þ Enter the Days in Membership that a student accrued in a school within your District that is not using i PASS or is not in the same database.
Þ If i PASS is a K-12 database for your District, then this field is not used.
Carry Over Attendance:
Þ Enter the Days in Attendance that a student accrued in a school within your District that is not using i PASS or is not in the same database. If i PASS is a K-12 database for your District, then this field is not used.
Days in Membership:
Þ This is a calculated field.
Days in Attendance:
Þ This is a calculated field.
Þ
Click ![]() to save your changes
to save your changes
Withdrawing a Single Student
Under <Biographical System> <Add/Modify Student Biographical> <Enrollment> tab.
Helpful Hint!
Do not modify a student’s existing record, you must click the add button and create a new withdrawal record for the student.
If a student is withdrawing and transferring from your school to another school within your district
i PASS, then you must also change the students “Primary School” as defined under <Biographical System> <Add/Modify Student Biographical> <Profile> tab. After withdrawing the student, notify the receiving school so that they can add the new Enrollment/Entry record. Remember to click submit and save your changes.
Add a new WITHDRAWAL Record
Under <Biographical System> <Add/Modify Student Biographical><Enrollment> tab.
Þ
Click ![]() to create a new
record
to create a new
record
School Enrollment:
Do not change these values. These will be changed by the receiving school.
School:
Entry Date In Building:
In Building Code:
Student Entry/Withdrawal Data – (Academic Year Enrollment)
These fields deal with the student’s Enrollment Record, in this case Withdrawal, out of your School Building and out of district for the current Academic Year
Entry/Withdrawal Date: <today’s date>
Þ Accept the default date of today or enter the first date that the student will NOT be in attendance in your school for this Academic Year.
Entry/Withdrawal Code:
Þ Select the correct Code from the pull-down list.
Reporting Reason:
Þ In most cases this Code will be the same Code that was used when the student was enrolled, it does not change. Select the correct Code from the pull-down list.
Enrollment Status:
Þ Select the correct Code from the pull-down list.
Þ If the student is transferring to another school within the District, then this Code will be the same Code that was used when the student was enrolled, it does not change.
Enrollment Reason:
Þ In most cases this Code will be the same Code that was used when the student was enrolled, it does not change. Select the correct Code from the pull-down list.
Comment:
Þ Enter any comment you wish, such as where the student is going.
FTE (Full Time Equivalency): <1>
Þ This field can be ignored. It does not apply to students who are withdrawing.
Out Placement: <No>
Þ This field can be ignored. It does not apply to students who are Withdrawing.
School Id:
Use this for only Out of District Students.
Þ Enter the state defined code for the School they are attending.
Þ All enrolled students should have this field blank.
Helpful Hint!
School ID will come directly from the District and School Profiles located in <Administration>District Recourses><District Profile> and <Administration> School Resources><School Profile>
Previous School:
Þ Leave this blank.
Previous School Comment:
Þ This field can be ignored. It does not apply to students who are Withdrawing.
Carry Over Membership:
Þ This field can be ignored. It does not apply to students who are Withdrawing.
Carry Over Attendance:
Þ This field can be ignored. It does not apply to students who are Withdrawing.
Days in Membership:
Þ This is a calculated field.
Days in Attendance:
Þ This is a calculated field.
Þ
Click ![]() to save
your changes
to save
your changes
Transferring a Student to a School within your District
Add a new TRANSFERRAL Record – under <Biographical System> <Add/Modify Student Biographical><Enrollment> tab.
Þ
Click ![]() to create a new
record
to create a new
record
Entry/Withdrawal Date: <today’s date>
Þ Accept the default date of today or enter the first date that the student will Not be in attendance in your school for this Academic Year.
Entry/Withdrawal Code:
Þ Enter the “TRF” code for students transferring to another school within the District. This entry will insure that the student is only reported to the DOE from one school.
Reporting Reason:
Þ Since the student is transferring to another school within the District, then this Code will be the same Code that was used when the student was enrolled, it does not change.
Enrollment Status:
Þ Since the student is transferring to another school within the District, then this Code will be the same Code that was used when the student was enrolled, it does not change.
Enrollment Reason:
Þ Since the student is transferring to another school within the District, then this Code will be the same Code that was used when the student was enrolled, it does not change.
Comment:
Þ Enter any comment you wish, such as where the student is going.
Þ
Click ![]() to save your changes
to save your changes
Helpful Hint!
This next step is only for a student that is transferring to another school within the District.
Change the Student’s Primary School
After a “TRF” (Transferred to Another School Within District) code is used then you need to go into the student’s profile screen found under <Biographical System><Add Modify Student Biographical><Profile>Tab and set the primary school to the school the student is transferring to.
Primary School:
Þ Select the school within your District that the student is transferring into from the pull-down list.
The student will now be available to the new school in the Student Selection Filter.
The student needs to have a NEW Enrollment Record added for their Entry into the new school, to be entered by the receiving school.
Helpful Hints!
Modifications/Corrections
You can click on any Enrollment Record and make Modifications or Corrections, if the codes have not been defined correctly or defaults were accepted instead of the correct code.
Make Them Go Away
If a student does not show-up and you want to remove them from your Student Selection Filter pull-down list and the DOE file. Modify their entry for the 1st day of school to the date of July 1 for that year and then ADD a new withdrawal record and give them a code of DELETED for July 2 of that year. You will still be able to access the student and re-enroll them.
No More “None”s
By mid to late September, there should be NO students listed using the NONE filtering option.
<Confidential>Tab
SSN:
Þ Enter the student’s social security number
Primary Language:
Þ This is a read only field and is filled in on the Language Tab.
Free Lunch:
Þ This field is used to indicate the type of Free Lunch Program that the student is eligible for.
Low Income:
Þ This field is submitted to the DOE to indicate if the student is low income eligible.
Title 1 Participation (MA)/Compensatory Education (CT):
Þ This field is submitted to the DOE to indicate if the student is participating in a Title 1 program or Compensatory Education Program.
Original Year of Graduation:
Þ This field will reflect the student’s anticipated Year of Graduation based on the year they first entered your district. This YOG should not be changed. It will be used to determine retention.
Ethnicity:
Þ Select the student’s Ethnicity. Use the control key to make a multi selection of Ethnic codes. This drop down is accessed under <Biographical System><Biographical Maintenance><Ethnic Codes>.
State ID: (SASID)
Þ This is a read only field and can only be edited under <DOE ID Manager><LASID/SASID Update>.
LASID:
Þ This is a read only field and can only be edited under <DOE ID Manager><LASID/SASID Update>.
Helpful Hints!
You may not have access to the <DOE ID Manager><LASID/SASID Update> due to your user profile in the <Security System>. If you need access to this feature then contact your District Administrator.
Special Needs:
This is a Yes/No field that is needed when running reports.
Þ Select YES or NO
RID #:
This field is used for Medicaid Billing information.
Þ This field should be left blank if the student is not a Medicaid student. Fill in the Medicaid ID# or any value, if the student is a Medicaid student. Entering YES will allow you to print an <Attendance System><Reports Attendance><Attendance History> Report to be used for reimbursement of services provided.
Exclude from Class Rank:
This is a Yes/No field that is used to indicate if a student should be left out of class rank regardless of grades or classes attended.
Þ Select YES or NO
Sped Status:
This field is used for reporting Special Education Program Status to the DOE.
Þ Select YES or NO
Sped Liaison:
Þ Enter the name of the student’s SPED Liaison, if applicable, or leave the field blank.
Title-1 Teacher:
Þ Enter the name of the student’s Title 1 teacher.
Migrant Status:
Þ Enter the student’s Migrant Status.
Immigrant Status:
Þ Enter the student’s Immigrant Status.
Country of Origin:
Þ Enter the student’s Country of Origin.
Transportation:
This is a Free Text field where SPED transportation arrangements can be kept.
Þ Enter the appropriate data or leave blank.
Outplacement:
This is a Free Text field where SPED Outplacement arrangements can be kept.
Þ Enter the appropriate data or leave blank.
Delete Special Services:
Þ Select Special Education services that are being provided for this student from the pull down list. When one or more services are defined and submitted 3 empty boxes will be available. Use <Biographical System><Biographical Maintenance><SPED Services> to define the table of services provided by the district.
<Language>Tab
English Proficiency:
Þ Enter the student’s English Proficiency Status.
English Language Learners Program Status:
Þ Enter the student’s English Language Learners Program Status.
Primary Language:
Þ Enter the student’s Primary Language.
ESL Teacher:
Þ Enter the student’s ESL Teacher, if applicable or leave blank.
TBE Teacher:
Þ
TBE Oral Language: Þ
Enter the student’s TBE Oral Language. TBE Oral Language Test Score: Þ
Enter the student’s TBE Oral Language Test Score. TBE LASRW Reading Score: Þ
Enter the student’s TBE LASRW Reading Score. TBE LASRW Writing Score: Þ
Enter the student’s TBE LASRW Writing Score. TBE Years in Program: Þ
Enter the student’s TBE Years in Program.
Enter the student’s TBE Teacher, if applicable or leave blank.
|
Special Education – Private Placement:
Þ Enter the student’s Special Education – Private Placement.
This screen displays all if the required Department of Education fields.
Report to DOE
Use this Yes/No field to indicate if the student should or should not be included in the Doe transmission.
Þ Accept the default of YES and the student will be reported to the DOE.
Þ Select NO if you do not want the student reported to the DOE.
<MA DOE> Tab
The Massachusetts SIMS data elements are included under this Tab. Fields that are Calculated, Constant or Secure cannot be edited from this screen. All others can be defined here or on related Tabs/Screens. Any changes are updated on all screens.
Default values are defined by the district in <DOE ID Manager><DOE Defaults> or under <DOE ID Manager><DOE Fields>.
<CTDOE> Tab
The Connecticut PSIS data elements are included under this Tab. Fields that are Calculated, Constant or Secure cannot be edited from this screen. All others can be defined here or on related Tabs/Screens. Any changes are updated on all screens.
Default values are defined by the district in <DOE ID Manager><DOE Defaults> or under <DOE ID Manager><DOE Fields>.
<Miscellaneous>Tab
The fields maintained on this page are defined under <Biographical System> <Biographical Maintenance> <User Defined Data>. Fields defined in this area should be considered and maintained district-wide for consistency reasons. You can set up fields to be Free Text or Drop Down choices.
Examples:
Internet Acceptable Use Policy Signed
Yearbook Purchase
Activity Assignments
Parent CORI checks
Parents returned Forms
<Alumni>Tab
This tab displays the information for students who have or will be graduated from your district. This tab is used to maintain information relevant to the Career and Technical Education One Year Follow up.
Post Grad Plans:
Þ Select the students Post Graduation Plans.
Helpful Hint:
Post Graduate plans will not be represented in the DOE transmission until the student’s enrollment status has become graduated. Once you graduate your seniors the post graduate plans will be populated in the DOE transmission, therefore, Post Grad Plans can be defined for any student at any time.
Major:
Þ Select a Major that the student will be attaining after graduation.
Hourly Salary:
Þ Select the Hourly Salary if the former student is working.
Field:
Þ Select the field that the former student is working in.
Same as Training:
Þ Use the Yes/No to indicate if the former student is working in the field they were trained in.
Still in District:
Þ Use the Yes/No to indicate if the former student still lives in the district.
Children Enrolled in District:
Þ Use the Yes/No to indicate if the former student’s Children are educated in the district.
Volunteer:
Þ Use the Yes/No to indicate if the former student is a Volunteer.
Contributor:
Þ Use the Yes/No to indicate if the former student is a Contributor to the district.
Contributions:
Þ Enter the contributions the former student has made.
Last Date:
Þ Enter the last date that the former student was contacted to obtain the above information.
<College Application>Tab
This tab is used to display information regarding the colleges a student has applied to. Information for the drop down menus on this screen are found in the <College System><College Maintenance>.
Helpful Hint:
You can also define Military Branches, “Work”, “Other” or “Unknown” in your College List to track students who are not college bond.
Post Grad Plans:
Þ Enter the student’s Post Graduation Plans.
Helpful Hint:
Post Graduate plans will not be represented in the DOE transmission until the student’s enrollment status has become graduated. Once you graduate your seniors the post graduate plans will be populated in the DOE transmission.
Major:
Þ Enter a Major that the student will be attaining in college.
Choice:
Þ Select a number to indicate the student’s preferences for each college applied to.
(This is a required filed if you are selecting a school)
Schools Applied:
Þ Select a college that the student has applied to.
Post Grad Plans of the School:
Þ Select the post grad plans that best describes the school.
Example:
2 Year Private College
4 Year Private College
Application Type:
Þ Enter the type of application.
Status:
Þ Enter the status of the application process.
Accepted:
Þ Use the Yes/No to indicate if the student was accepted to the college listed.
Attend:
Note: This field must be set to YES to have results be included on certain reports.
Þ Use the Yes/No to indicate if the student is attending the college listed.
Þ
Use the ![]() button to delete a college from the student’s
record.
button to delete a college from the student’s
record.
<Transportation>Tab
This tab is used to Add/Modify or display Bus information for the student. Information for the drop downs in this screen are found in the <Bus System><Bus Maintenance>.
Þ Enter the bus used each day of the week to arrive at school and return home. You can set up the system to enter walkers, Parent Pick-ups and students who attend after school activities.
<Government Test> Tab
This tab is used to Add/Modify or display Government Test Scores.
Þ To Modify test scores click on the test name. On the next screen you will be able to delete or change scores, the test date or Grade Level.
Þ To Add a test Score click on the Add Button. On the next screen you can add scores, test date and Grade Level.
Þ To delete the Test Record click on the Delete Record ?
Þ
Click ![]() to submit the Test Record
to submit the Test Record
<Career and Tech> Tab
This tab is used to Add/Modify or display Career and Tech Program information.
Occupational Ed Type:
Þ Select the Occupational Ed Type.
Shop:
Þ Select the Shop.
Shop Week:
Þ Select the Shop Week.
Shop Homeroom:
Þ Select the Shop Homeroom.
Economical Disadvantage:
Þ Select YES/NO.
Physically Disadvantage:
Þ Select YES/NO.
Educationally Disadvantage:
Þ Select YES/NO.
Co-op Placement:
Þ Select YES/NO.
Co-op Supervisor:
Þ Select YES/NO.
Co-op Phone:
Þ Enter the Phone Number.
Co-op:
Þ Select YES/NO.
Hourly Salary:
Þ Enter the Hourly Wage.
Þ
Click ![]() to submit the data.
to submit the data.
Mass Update Students
Data
to Update
This program is generally used just prior to the beginning of a new school year. It is designed to allow you to set an enrollment code, date, reason, comments, etc. that can then easily be applied to a large body of students at once. Typically it is done a grade level at a time.
Helpful Hint!
When you are Mass Enrolling Students for a new School Year ALL students MUST have a new Enrollment/Entry Record for a new Academic School Year.
ALL students MUST have their “Next Year’s Primary School” set to the school where they will be in attendance in the new school year.
Students do not need to be enrolled in order to process requests and schedules fro the new year.
Example:
You have just completed the 2004-2005 school year and you are preparing the database to open the 2005-2006 school year. ALL students that you are planning to re-enroll MUST have a “Next Year’s Primary School” (within 2004-2005) set to the school where they will be in attendance in the new school year (2005-2006), regardless of the school they attended in this year (2004-2005).
The “Next Year’s Primary School” (within 2004-2005) should be BLANK for those students who will not be in attendance in any other school within the District for the new school year (2005-2006).
The default Academic Year for the DISTRICT MUST be set to the new school year (2005-2006).
The SCHOOL Calendar MUST be defined for the new school year (2005-2006).
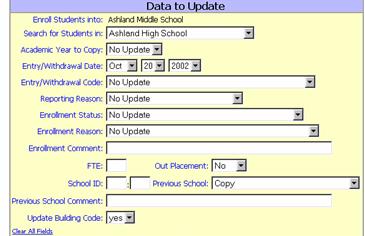
Figure 10
Enroll Students into:
This is the school that the selected students will be into.
Þ It is your default school and may need to be changed in <My Data><Set Default School>
Search for Students in:
This is the default school the system will use to search for your students, if you are using the “Copy” feature.
Þ Select a school.
Academic Year to Copy:
Þ Selecting this choice will copy the value of the field selected from the last (most recent) Enrollment record of the student in their previous school year.
Helpful Hint!
This will preserve any variations in the Enrollment records of the students who have settings (DOE values in particular) that are exceptions to the majority of your students. Be very cautious when using the “Copy” Feature!
Entry/Withdrawal Date:
Þ Select the date you expect the students to first be in attendance in your school for the new school year, the first day of school.
Entry/Withdrawal Code:
Þ Select the code for this new enrollment record that is appropriate for the students who you will be applying the code to upon completing this process. Use the “Copy” option if you want to duplicate the code used from the previous year.
Example:
Generally students moving from Middle School to High School will have an Entry Code of “Re-Enrolled - Same District”.
Students, who were in your school during the previous school year and will be returning again, will have an Entry Code of “Re-Enrolled – Same School” and the “Copy” option can be selected.
Students who are entering school for the first time (Kindergarten) will have an Entry Code of “Original Entry in US”.
Reporting Reason:
Þ Select the code for this new enrollment record that is appropriate for the students you will be applying to this code when you complete this process. Select “Copy” if you want to duplicate the Reporting Reason value from the previous year.
Enrollment Status:
Þ Select the code for this new enrollment record that is appropriate for the students you will be applying to this code when you complete this process. Select “Copy” if you want to duplicate the Enrollment Status value from the previous year.
Enrollment Reason:
Þ Select the code for this new enrollment record that is appropriate for the students you will be applying to this code when you complete this process. Select “Copy” if you want to duplicate the Enrollment Reason value from the previous year.
Helpful Hint!
Generally, the last three (3) fields will remain unchanged from year-to-year and the “Copy” option should be selected.
Enrollment Comment:
Þ This field is informational only. Suggestion, enter a comment of “Re-Enrolled 2005-2006” substituting the “academic year” for the year you are preparing to open.
FTE (Full time Equivalency):
Þ Enter one (1) if the student is a full-time student and enrolled 100% of the time in your school.
Þ Enter the decimal value that represents the amount of time a part-time student is enrolled in your school.
Þ Type the word “copy” if you wish to copy the students’ FTE from their previous year.
This field is not based on a student’s possible participation in Special Education.
Out Placement:
Þ Accept the default of No if these student’s are not Out-Placed to a facility outside of your School and/or District or as defined by your Department of Education.
School ID:
Use this for only Out of District Students.
Þ Enter the state defined code for the School they are attending.
Þ All enrolled students should have this field blank.
Helpful Hint!
For students going to “Special Educational Outplacements” you must modify the School ID to indicate the appropriate code of the school where they will be educated.
Previous School:
Leave this field blank for the Mass Enrollment Process. The student’s Pervious School field will be defined automatically based on the enrollment and Primary School/year records.
Previous School Comment:
Þ This field is informational only. You should leave this field for mass enrollment purposes and edit it on an individual student basis, if necessary.
Update Building Code:
Þ Accept the default of “No” if the students that you are planning to “Mass Enroll” were in your building during the previous school year.
Þ Select “Yes” from the pull-down list if the students that you are planning to “Mass Enroll” were NOT in your building during the previous school year.
Mass Enroll Students (Student Search Criteria)
This screen allows you to select the group of students that you want to have listed in order to apply the set of codes that you defined above in the “Data to Update” screen. The system will only list those students who’s “Next Year Primary School” in the previous school year (2004-2005) is set to your school and they are not currently enrolled for the new school year (2005-2006).

Figure 11
Student ID:
Þ You may enter a single Student ID#, a string of ID #’s separated by commas (no spaces) or leave this field blank (most common use with this screen) to filter on other screens.
Last Name:
Þ You may enter the last name or any part of the last name of a student. Enter a single letter as the first letter of one or more students. Enter a range of letters to filter students whose first letter of their last name is within that range. (Example: A-M)
Homeroom:
Þ Select one or more Homerooms to filter students assigned to those Homerooms.
Grade Level:
Þ Select one or more Grade Levels to filter students assigned to those Grade Levels.
Gender:
Þ Accept the default of both to include all students regardless of Gender. Select Male or Female from the pull-down list to filter your select.
Shop:
Þ Select one or more Shop(s) to filter students assigned to those Shop(s).
Sort:
Þ Select how you want the students displayed.
§ Name
§ Homeroom/Name
§ Grade Level/Name
Þ
Click ![]() to filter records
to filter records
The system will display a list of the students who meet your selection criteria. The students that are checked will be updated with the values selected in the upper section or have the values copied from their previous year’s record if the “Copy” option was selected.
Þ Use the check boxes to identify which students will be updated and which students will not be updated with the record that you have defined.
Þ Use the Check All, Clear All options to facilitate your selection/de-selection process.
Students who do not show up on the first day, or arrive late.
DO NOT create a new record. Modify the Enrollment record for the first day of school to reflect their exact arrival date and submit your changes.
Suggestion:
“No-show” students. Modify their Enrollment record for the first day of school to be a Withdrawn on July 1st, rather than Entry. You can also go into Primary School Year and delete the primary school record for the New Year. This will assure that the student does not get sent to the DOE at reporting time.
<Assign HR from Schedule>Tab
Use this tab to assign homerooms based on a period in your schedule.
Example:
All Quarter 1, Period “A” classes on the Monday cycle will serve as the student’s homeroom.
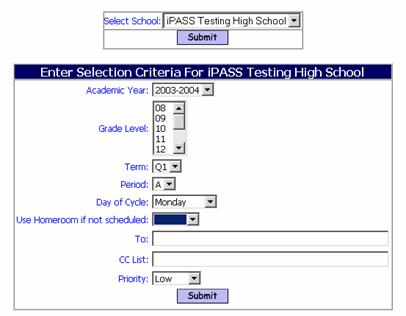
Figure 12
Academic Year:
Þ Enter the academic year that you want to assign Homerooms in.
Grade Level:
Þ Enter the grade level you want to assign homerooms in.
Term:
Þ Enter the term that you want to access in the schedule.
Period:
Þ Enter the period that you want to access in the schedule.
Day of Cycle:
Þ Enter the Day of the Cycle that you want to access in the schedule.
Use Homeroom if not scheduled:
Þ Enter a homeroom that you want assigned to students who do not a class scheduled for the Quarter, Period and Day of Cycle chosen.
Þ
Click ![]() to assign homerooms
to assign homerooms
A report is sent to <My Data><My Reports> listing students who were not assigned a homeroom based on the schedule.
<Mass Load Homerooms>Tab
Use this tab to assign homerooms for selected students based on a student ID Number, Student Last Names or existing homeroom assignment.
Examples:
All students with ID Number are 1001-1020 will be assigned to one homeroom.
All Students with lasts names beginning with A-B will be assigned to one homeroom.
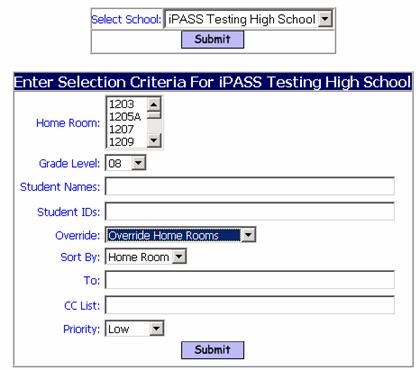
Figure 13
This procedure will Mass fill Homerooms based on the fields defined in <Administration><School Recourses><Room Catalog>. Homerooms will be loaded in Room Catalog order based on grade level, capacity and the room being defined as a homeroom (YES/NO).
Homeroom:
Þ Enter the existing homeroom assignment of the students you wish to re-assign.
Grade Level:
Þ Enter the Grade level you wish to re-assign.
Student Names:
Þ Enter a range of student’s last names you wish to re-assign.
Student IDs:
Þ Enter a range of student ID numbers you wish to re-assign.
Override:
Þ Enter “Override Homerooms” to replace an existing homeroom or to fill a blank homeroom field.
Þ Enter “Keep Existing Homerooms” to only fill in blanks.
Þ
Click ![]() to assign homerooms
to assign homerooms
A report is sent to <My Data><My Reports> listing students who did not get a homeroom assigned.
<Mass Update Lockers>Tab
This tab is used for assigning Lockers to groups of students based on Locker Numbers, a Range of Locker Numbers or Locker location. NOTE: This option may also be found in the <Locker System> folder.
Examples:
Assign Lockers in a certain Location to students in the 9th Grade.
Assign Lockers from a range to students in the 12th Grade.

Figure 14
Locker Types:
Þ Enter the Locker Type you want to assign.
Lockers:
Þ Enter the Locker numbers separated by a comma you wish to assign.
Locker Range From:
Þ Enter the first locker number in the range that you wish to assign.
Locker Range To:
Þ Enter the last locker number in the range you wish to assign.
Locker Location:
Þ Select the location(s) of the lockers you wish to assign.
Clear Location:
Þ Select YES or NO.
Assign Lockers Based on Location:
Þ Select YES or NO.
|
Student Search Criteria |
||||||||||||||||
|
Figure 15
Student ID:
Þ Enter the student ID Numbers separated by a comma you wish to search for.
Last Name:
Þ Enter a list of student Last Names separated by a comma, list a range of names; Abits-Barnfield, or enter a range of letters that begin the last names; A-M.
Homeroom:
Þ Select the Homeroom that you wish to search for.
Grade Level:
Þ Select the grade level that you wish to search for.
Gender:
Þ Select Male, Female or Both.
Students Per Locker:
Þ Select No Sharing, 2 Per Locker or 3 Per Locker.
Ignore Prior Locker:
Þ Select "No, Only Assign New Lockers" or "Yes, Overwrite Existing Assigned Lockers".
Þ
Click ![]() to filter records
to filter records
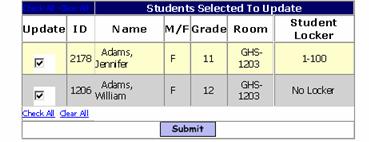
Figure 16
Update:
Þ A check in this box indicates that the student record will be updated with the locker assignment.
Check All:
Þ Click this to place a check mark in each student’s record.
Clear All:
Þ Click this to remove all check marks.
Þ
Click ![]() to assign the Lockers
to assign the Lockers
<Mass update Students>Tab
Use the Mass update tab to update Student’s Bus, Homeroom, Lunch Status, Counselor, Shop Week/Cluster, Next Year’s School and Next Year’s Homeroom.
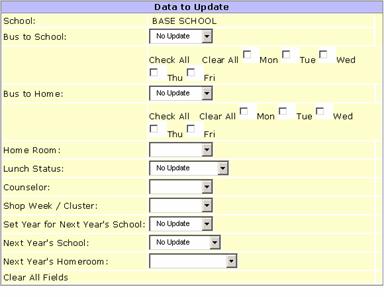
Figure 17
School:
Þ Make sure you are in the proper default school.
Bus to School:
Þ Click on the Bus you want to assign.
Þ Check the Days of the week the Students will ride the Bus to School.
Þ Use “Check All” or “Clear All” options to facilitate your selection/de-selection process.
Bus to Home:
Þ Click on the Bus you want to assign.
Þ Check the Days of the week the Students will ride the Bus to Home.
Þ Use “Check All” or “Clear All” options to facilitate your selection/de-selection process.
Homeroom:
Þ Select the Homeroom you want to assign.
Lunch Status:
Þ Select the Lunch Status you want to assign.
Counselor:
Þ Select the Counselor you want to assign.
Shop Week/Cluster:
Þ Select the Shop Week/Cluster you want to assign.
Set Year for Next Year’s School:
Þ Select the Academic School Year you want to assign.
An Academic School Year is necessary when assigning Next Year’s School and/or Next Years Homeroom.
Next Year’s School:
Þ Enter the Next Year’s school you want to assign.
An Academic School Year in the Set Year for Next Year’s School field is necessary when assigning Next Year’s School.
Next Year’s Homeroom:
Þ Enter the Next Year’s Homeroom you want to assign.
An Academic School Year in the Set Year for Next Year’s School field is necessary when assigning Next Years Homeroom.
Clear All Fields:
Þ Click this to clear the data from all the above fields if necessary and re-define them.
Use the Student Search Criteria portion of the screen to find students to update.
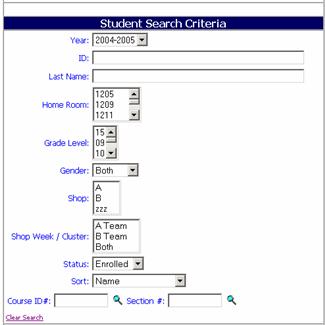
Figure 18
Year:
Þ Select the Academic Year that you want to search in.
Student ID:
Þ Enter the student ID Numbers separated by a comma you wish to search for.
Last Name:
Þ Enter a list of student Last Names separated by a comma, list a range of names; Abits-Barnfield or enter a range of letters that begin the last names; A-M.
Homeroom:
Þ Select the Homeroom that you wish to search for.
Grade Level:
Þ Select the grade level that you wish to search for.
Gender:
Þ Select Male, Female or Both.
Shop:
Þ Click on the Shop you want to use in your search.
Shop Week/Cluster:
Þ Click on the Shop Week/Cluster you want to use in your search.
Status:
Þ Click on Enrolled or Incoming.
Sort:
Þ Select the sort order you want the students displayed in.
§ Name
§ Homeroom/Name
§ Grade Level/Name
Course ID:
Þ Click on the magnifying glass to select the course ID.
Course Section:
Þ Click on the magnifying glass to select the course section.
Clear Search:
Þ Click on this to clear all the search fields.
Þ
Click ![]() to filter records
to filter records
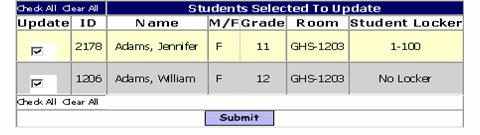
Figure 19
Update:
Þ A check in this box indicates that the student record will be updated.
Check All:
Þ Click this to place a check mark in the box in front of each student’s record.
Clear All:
Þ Click this to remove all check marks.
Þ
Click ![]() to update the student’s records
to update the student’s records
Biographical Reports
Biographical reports are located under <Biographical System><Reports-Biographical>
Each report has a set up screen, which allows the user to set up criteria to filter on and criteria to Sort on.
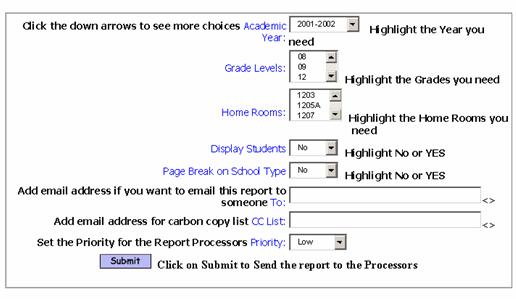
Figure 20
Helpful Hint!
Most reports can be filtered by school. If you have access to more then one school, then you will have the ability to change the school you want to filter by and click on submit. Your default school will be shown in the drop down when you open the report tab. Once the submit button is clicked the report will be processed and sent to <My Data><My Reports> for you to view.
Selection Criteria: Selection options may be available under Enter Selection Criteria. Selections allow the user the ability to limit what information will be listed on the report. Examples; students in second grade only, courses taught by a single teacher or all special education students. If you do not make a selection in a drop down box, then all the criteria listed in that box will be included in the report.
If the option to select criteria by Student IDs is available, then type a list of student IDs separated by commas into the box to use this feature. If no students IDs are listed then all students will be included.
Hold down the shift key on your Keyboard to highlight the whole selection list or selections on the list in order. Use the Control Key on your Keyboard to highlight selections on the list when you need to skip selections.
Sorting: Sorting options may be available under Enter Selection Criteria. Sorting allows the user the ability to list the information in a certain order. Examples; list students by last name, courses by teacher’s last name, or list by courses in alphabetical order. Sorting options are restricted to the list provided.
To: This box allows you to enter an email address or several addresses of people you want to send the report to. List email address separated by semi-colons.
CC list: This box allows you to enter an email address or several addresses of people you want to cc: a copy of the report to. List email addresses separated by semi-colons.
Priority: This box allows you to set a priority level for the report processor. Priority options are limited to the list provided.
<Mailing Labels> Report
Mailing Labels is the most used report in the Biographical System. Below is an in-depth explanation of how to run the mailing labels report.

Figure 21
Student ID:
Þ Enter a single Student Id# or a string of Student ID Numbers separated by commas.
Þ Leave the field blank to include all students or those meeting the additional criteria identified in the other option within the selection criteria.
Grade Levels:
Þ Select one or more Grades Levels to include.
Þ Leave the list with no Grade Levels highlighted to include all students regardless of Grade Level.
Homerooms:
Þ Select one or more Homerooms to include.
Þ Leave the list with no Homerooms highlighted to include all students regardless of Homeroom assignment.
Label Type: <Student Only>
Þ Select the format you wish to use from the pull-down list.
Þ “Student Only” will print the student’s name with the address(s) selected.
Þ “Parent & Student” will print both the “Parent Name” (first line) and the student’s name second line.
Þ “Parent/Guardian of:” will print the line “To the Parent/Guardian of:” above the student’s name the guardian’s name and the address(s) selected.
Þ “Parent Only” will print the “Parent Name” and the address selected.
Helpful Hint!
The “Parent Name” is the name defined within the “Mailing Address of Student” on the student’s biographical profile page. It is intended to provide the option of a formal combined name such as “Mr. & Mrs. John Smith”. Other options allow you to create labels using Guardian names rather than this mailing name format.
Include Students: <Yes>
Þ Select “No” to exclude students and only print labels for Guardians bases other selections.
Include Guardians: <No>
Þ Accept the default to not include Guardians.
Þ Select “Yes” to include labels for designated Guardians using the Guardian information for names and addresses based on additional selection criteria.
Guardian Receives Mail: <No>
Þ Accept the default to not produce labels for Guardians who are designated to receive mail, but do not live with the student.
Þ Select “Yes” to include these Guardians.
Guardians:
Þ Select one or more Relationship types to produce mailing labels.
Þ Leave the list with no Guardians Relationship types highlighted to include all Guardians based on other selection criteria.
Legal Status:
Þ Select one or more Legal Status types to produce mailing labels.
Þ Leave the list with no Legal Status types highlighted to include all types based on other selection criteria.
Address: <Student>
Þ Accept the default to use the “Resident Address of Student” for the student’s label. The address defined for a Guardian will be used if Guardians are selected to be included.
Þ Select “Mailing” to use the “Mailing Address of Student”.
Enroll Status: <Enrolled>
Þ Accept the default to produce labels for Enrolled students.
Þ Select a different enrollment status from the pull-down list of <Withdrawn, Graduated, All or None>.
Label Style: <AVRY5160>
Þ Accept the default label style.
Þ AVRY5160 are standard address labels 1” X 2 5/8”, 3 columns of 10 labels per page. This style defines the layout for the program. The size of the labels and sheet layout are the important factors and brands other than Avery can be used. The Avery 5160 codes denotes this style, it also denotes the number of sheets per package. Avery 5160 = 100 sheets per package, Avery 5960 = 250 sheets per package and Avery 5260 = 25 sheets per package. Clear and removable label pages of 30 labels per page will work.
Þ Other Label Styles in the pull down list are used for other types of labels. AVRY5163 and AVRY5164 labels are used for Permanent Record Labels. AVRY5536 labels are used for Bio File Labels.
Include Incoming: <No>
Þ Accept the default to not produce mailing labels for Incoming students.
Þ Select “Yes” to include Incoming students.
Þ Use this option to create labels for Incoming students in combination with other criteria. Select “None” from the “Enroll Status” option to create labels for Incoming students only.
Course:
Þ Enter a Course number to create mailing labels for all students in all sections of a course.
Þ Enter a Course and Section number (101-3) to create mailing labels for all students in a single section of a course.
Sort By: <Name>
Þ Accept the default to sort by student last name + first name.
Þ Select a different sorting option from the pull-down list of Grade Level, Homeroom and Zip Code.
Sample Output:

<Advanced Export> Report
The Advanced Export Report is used to export specific student information based on the codes entered in each field into excel a report, a CSV (Comma Separated Value) file or a custom label. This report can include the following data Elements:
Below are a List of Fields and their description available in the Advanced Export Report.
|
Student ID |
Student’s iPASS Id |
|
Last First Name |
Student’s Last Name and First Name together |
|
Last Name |
Student’s Last Name |
|
First Name |
Student’s First Name |
|
Middle Name |
Student’s Middle Name and blank if no Middle Name |
|
Middle Name NMN |
Student’s middle name and NMN if no Middle Name |
|
Grade Level |
Student’s Grade Level |
|
HomeRoom |
Student’s Homeroom, This is the homeroom on the profile page only |
|
HomeRoom Teacher |
Student’s Homeroom Teacher |
|
Birth City |
Student’s Birth City DOE008 |
|
Birth State |
Student’s Birth State |
|
Birth Country |
Student’s Birth Country |
|
Bus Route Monday AM |
The Bus that the student rides to school on Monday Morning |
|
Bus Route Monday PM |
The Bus that the students rides home on Monday Afternoon |
|
Country of Origin |
Student’s Country of Origin DOE023 |
|
Address 1 |
Resident Address Line 1 Street Name Usually |
|
Address 2 |
Resident Address Line 2 PO Boxes or Suites Usually |
|
Street Number |
Resident Street Number |
|
Street Number + Address 1 |
Resident Street Number and Address Line 1 Street Name |
|
City |
The City listed in the student’s Resident Address |
|
State |
The State listed in the student Resident Address |
|
Zip |
The Zip code listed in the student's Resident Address
|
|
Phone (use type) |
The phone type is chosen below in the filtering and sorting section of the screen. This will list whatever phone number is entered with the phone type chosen |
|
Phone Rank 1 |
This will list the Student’s phone number entered with a Rank 1 on the Profile screen |
|
Phone Rank 2 |
This will list the student’s phone number entered with a Rank 2 on the Profile screen |
|
Mail Parent Name |
This will list the information from the Mail Parent field on the Student’s Profile Screen |
|
YOG |
Year of Graduation |
|
Original YOG |
The Original Year of Graduation. |
|
Gender (M/F) |
M=Male and F=Female |
|
SASID |
This will list the SASID |
|
LASID |
This will list the LASID |
|
DOB (mm/dd/yy) |
Date of Birth in the 09/20/89 format |
|
DOB (mm/dd/yyyy) |
Date of Birth in the 09/20/1989 format |
|
District Name |
School District’s Name |
|
School Name |
School Name |
|
School Code |
The 8 digit School ID number |
|
Counselor |
This will list the Counselor from the Student’s Profile Screen |
|
Count |
This numbers the students to get a count |
|
Ethnicity |
DOE010 Race Description |
|
Ethnicity State Code |
DOE010 State Code |
|
Lunch Type |
This lists the information in the Free Lunch field from the Student’s confidential Screen |
|
English Proficiency |
DOE025 Limited English Proficiency or ELL Description |
|
English Proficiency State Code |
DOE025 Limited English Proficiency or ELL Code |
|
Shop |
This is the shop field from the Career and Tech Ed Screen |
|
Shop Cip # |
This number is found in the Tech Ed Tab under Biographical Maintenance and is based on the Shop Code selected in the Career and Tech Ed Screen |
|
Special Needs |
This is the YES/NO field on the confidential screen |
|
Sped Status |
DOE034 Sped Status Description |
|
Sped Status State Code |
DOE034 Sped Status Code |
|
Primary Language |
DOE024 First Native Language Description |
|
Primary Language State Code |
DOE024 First Native Language Code |
|
Town |
DOE014 Town of Residence |
|
Occupational Ed Status |
DOE035 Career and Tech Program Type Description |
|
Occupational Ed Status State Code |
DOE035 Career and Tech Program Type Code |
|
|
The Student’s Email |
|
Sped Liaison |
This is the text field on the confidential screen |
|
Educationally Disadvantaged |
This is a YES/NO filed form the Career and Tech Ed Screen |
|
Soc Security# |
The Student’s Social Security Number |
|
Title I |
DOE020 Title 1 code |
|
Name Suffix |
This is a field on the profile page for Jr., Sr., III ect. |
|
Previous School Name |
Previous School Name |
|
Previous School Year |
Previous Year associated with the previous school |
|
Low Income Status |
DOE019 Low Income description and Code |
|
Entry/Withdrawal Date |
The original entry date into the district |
|
Last Middle First Name |
Student’s Last, Middle and First name all in one column |

Figure 22
Modify/Edit: The Advanced Export report setups can be saved to be used again. Saved reports will be listed here. Click on the report’s name to access a saved setup.
Save As: After you edit a saved setup find the name of the setup in the Save As box and click submit to save the changes.
Create Saved Report: After you have created a setup for a report you can save this report. Enter a name in the Create Saved Report box and click Submit.
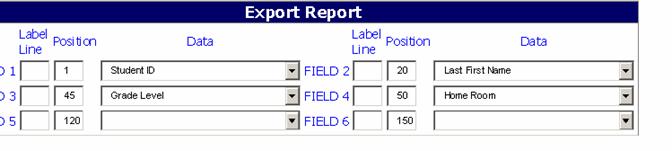
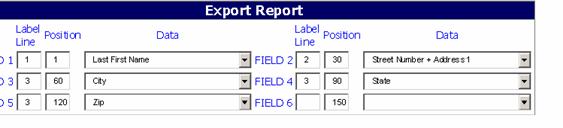
Label Line: Use this box to indicate which line of the label the information should be printed on.
Position: Use this box to indicate the number of characters to the right each field should print on the report.
Operator: Select the operator that fits the data you wish to export.
= Equal to
<> Not Equal to
> Greater Than
< Less Than
>= Greater than or Equal to
<= Less than or Equal to
BEGINS Begins with
Value: Select the value that fits the statement above.
Selection Criteria: Student ID, Enrollment Start Date, Enrollment End Date, School, Grade Level, Homeroom, Special Needs, Which Address, Which Phone Type, Label Style and Include Incoming.
Sorting: Name, Grade Level, Homeroom
Output:
The Advanced Export Report is generated and posted to <My Data><My Reports> in the following formats.
RTF
This option produces the Label format if you have indicated label lines in the creation of the report.
Þ Click on this link will open the report in a Rich Text Format
HTML
Þ Click on this link will open the report in HTML (Web Page)
TEXT
Þ Click on this link will open the report in Text Format (Data Format)
CSV
Þ Click on this link will open the report in a Comma Separated Value format.
Excel
Þ Click on this link will open the report in Microsoft Excel
Sample Output:
In the above figure the following fields were chosen.
Student ID
Ethnicity Code (=) Equaling 03 which is Black or African American
Primary Language Code (=) Equaling 007 which is Spanish
The Text Format below lists the selected data for all the students who are both Black and have a Primary Language of Spanish.
2178 03 007
1206 03 007
1587 03 007
2322 03 007
2323 03 007
<Birthday List> Report
The Birthday list report provides student Birthday information.
Selection Criteria: Grade Level, Home Rooms, Months, Enrollment Status, Older Than (Add a number of years) and Younger Than (Add a number of years).
Sorting: Name, Grade, Home Room, Date of Birth and Month of Birth.
Sample Output:
ID Name Grade Gender HR DOB Age
2212 Abbott, Jane 12 F 2210 04/16/1986 18
2178 Adams, Jennifer 11 F 1203 04/15/1985 19
1206 Adams, William 12 F GYMA 09/28/1984 19
1587 Ahearn, Christopher 10 M 2210 04/25/1986 18
<Applicant> Report
The Applicant report is used by Technical Vocational Schools who have an application process. Under Miscellaneous fields schools can add fields that they want to collect information in. Technical Vocational school would set up a field for Applicants Acceptance.
Selection Criteria: Grade Level, Home Rooms, Miscellaneous Field and City/Town.
Sorting: Name/Selected Field, Grade/Selected Field, Home Room/Selected Field, and
Town/Selected Field.
Sample Output:
ID Name Grade HR M/F Sped Town MiscField Prev School
2212 Abbott, Jane 12 2210 F no 100 Yes
2310 Adams, Jennifer 12 NHS F no 100 Yes
1206 Adams, William 12 GYMA F no 100 Yes 1998 East Elem
1587 Ahearn, Christopher 10 2210 M no 100 Yes
<Applied Accepted Attending> Report
The Applied Accepted Attending report is used by High Schools who use the College Module. This report indicates which colleges students have applied to, been accepted to and are attending.
Selection Criteria: Academic Year, Grade Level, Home Rooms, Display Students and Page Break on School Type.
Sorting: This report automatically sorts by College School Type and College Name.
Sample Output:
Academic Year: 2001-2002
Grade Levels:
Home Rooms:
Display Student Yes
Page Break on S No
School Applied Accepted Attending
01 - Four Year Public College
Test college 4 0 0
2212 Abbott, Jane
2212 Abbott, Jane
1973 O'Aberle-Kendal, Christa
1973 O'Aberle-Kendal, Christa
<Bio File Labels> Report
The Bio File Labels report is used to make student file labels. This report indicates the Year of Graduation, Student Name, Student ID and Counselor’s name on a label that can be affixed to a file folder.
Selection Criteria: Student ID (Add a list of Student IDs separated by a comma), Grade Level, Home Rooms, Enrollment Status, and Label Style.
Sorting: Name, Grade Level and Home Room.
Sample Output:
![]()
<Bio Label> Report
The Bio Label report is used to make student file labels. This report indicates Student’s Name, Gender, Student ID, Parents Name, Street Address, Home Room, City, State, Zip Code and Phone Numbers.
Selection Criteria: Student ID, Grade Level, Home Rooms, Enrolled Status, and Label Style.
Sorting: Name, Grade Level and Home Room.
Sample Output:

<Bio SASID Label> Report
The Bio SASID Labels report is used to make student MCAS labels. This report indicates the Student Name, Year of Graduation, Gender, Student ID, Date of Birth and SASID on a label that can be affixed to the MCAS Test Booklets.
Selection Criteria: Student ID (Add a list of Student IDs separated by a comma), Grade Level, Home Rooms, Enrollment Status, and Label Style.
Sorting: Name, Grade Level and Home Room.
Sample Output:

<Comment Label> Report
The Comment Labels report is used to make student labels. This report indicates Name, Year of Graduation, Gender, Student ID, Home Room, Grade Level, Date of Birth and up to 3 comments of the user’s choice.
Selection Criteria: Student ID (Add a list of Student IDs separated by a comma), Grade Level, Home Rooms, Enrollment Status, and Label Style. Users can add up to 3 comments to be printed on the label.
Sorting: Name, Grade Level and Home Room.
Sample Output:

<Bus List> Report
The Bus List report is used to make a student list of Bus routes. This report indicates Student ID, Name, Address, Phone Number, Home Room, Year if Graduation, Gender, Grade Level, Town and Bus Routes for each day of the week.
Selection Criteria: Academic Year, Grade Level, Bus Route, Street, Home Rooms, Town, Enrollment Status, Include Incoming and Page Break by.
Sorting: Bus/Street/Name, Street/Street Number, Town/Bus/Street/Name, Town/Street/Street Number, Home Room/Name.
Sample Output:
Year 2001-2002
Grade Levels:
Bus Route:
Street:
Home Rooms:
Town:
Enroll Status: Enrolled
Include Incomin No
Page Break By:
Sort By: Bus/Street/Name
ID Name Address Phone HR YOG M/F GL Town Bus: Mon Tue Wed Thu Fri
1218 Lane, Darcy 3445 Acacia Street SC 2003 F 11 School 144 150 144 150 144
Home 144 150 144 150 144
1393 Anderson, Steven 3601 Adams Place GYMA 2005 M 09 School Walk Walk Walk Walk Walk
Home Walk Walk Walk Walk Walk
1045 D'Amico, Frank 2005 Adams Place 2203 2003 M 11 School Walk Walk Walk Walk Walk
Home Walk Walk Walk Walk Walk
<Counselor Report> Report
The Counselor report is used to make a student list with their Counselor’s Name. This report indicates Student ID, Name, Gender, Grade, Home Room and Counselor.
Selection Criteria: Grade Level, Home Room, Enrollment Status, Counselor, Shop Code, Gender and Special Needs Only.
Sorting: Name, Grade, Home Room, Counselor and Gender
Sample Output:
ID Name Sex Grade Homeroom Counselor
2212 Abbott, Jane F 12 2210 Ms. Healey
2178 Adams, Jennifer F 11 1203
1206 Adams, William F 12 GYMA Ms. Healey
<Entry/Withdrawal Report> Report
The Entry/Withdrawal report is used to make a student list with their Entry/Withdrawal codes. This report indicates Student ID, Name, Grade Level, Year of Graduation, Gender, School Name, Entry Withdrawal Date, DOE011, DOE012, DOE013, Town Code and Town Name.
Selection Criteria: School, From Date, To Date, Grade Level, Town of Residence, Entry/Withdrawal Code and Enrollment Status.
Sorting: Name, Grade Level, Town Code/Zip Code, Zip Code, Entry/Withdrawal, Date, Shop Code.
Sample Output:
ID Name GL YOG M/F School Date E/W DOE-11 DOE-12 DOE-13 Town
2212 Abbott, Jane 12 2002 F iPASS 09/07/2001 E TRF 01 01 00 100 Framingham
2178 Adams, Jennifer 11 2003 F iPASS 09/05/2001 E R1 01 01 01 014 Ashland MA
1206 Adams, William 12 2002 F iPASS 09/05/2001 E R1 01 01 01 100 Framingham
3199 Agostini, Shara 09 2005 F iPASS 09/05/2001 E R4 01 01 01 014 Ashland MA
<Export Report> Report to make a List or Export to Excel
The Export Report is used to export student information to Text, CSV (Comma Separated Value) File, Excel or to make custom labels.
This report can include the following information: (See Advanced Export Report for definitions)
Student ID, Last First Name, Last Name, First Name, Middle Name, Middle Name NMN, Grade Level, Home Room, Home Room Teacher, Birth City, Birth State, Birth Country, Bus Route Monday AM, Bus Route Monday PM, Country of Origin, Address 1, Address 2, Street Number, Street Number + Address 1, City, State, Zip, Phone (use type), Phone Rank 1, Phone Rank 2, Mail Parent Name, YOG, Original YOG, Gender (M/F), SASID, LASID, DOB (mm/dd/yy), DOB (mm/dd/yyyy), District Name, School Name, School Code, Counselor, Count, Ethnicity, Ethnicity State Code, Lunch Type, English Proficiency, English Proficiency State Code, Shop, Shop Cip #, Special Needs, Sped Status, Sped Status State Code, Primary Language, Primary Language State Code, Town, Occupational Ed Status, Occupational Ed Status State Code, Email, Sped Liaison, Educationally Disadvantaged, Soc Security#, Title I, Name Suffix, Previous School Name, Previous School Year, Low Income Status, Entry/Withdrawal Date, Last Middle First Name
Selection Criteria: Student ID, Enrollment Start Date, Enrollment End Date, School, Grade Level, Homeroom, Special Needs, Which Address, Which Phone Type, Label Style and Include Incoming.
Sorting: Name, Grade Level, Homeroom
Sample Output:
Test Version
2212 Abbott, Jane 12 2210
2405 Adams, Hannah 08 221
2178 Adams, Jennifer 11 1203
1206 Adams, William 12 GYMA
<Export Report> Report to make Mailing Labels
The Export Report is used to export student information or to make custom labels. This report can include the following information: Student ID, Last First Name, Last Name, First Name, Middle Name, Middle Name NMN, Grade Level, Home Room, Home Room Teacher, Birth City, Birth State, Birth Country, Bus Route Monday AM, Bus Route Monday PM, Country of Origin, Address 1, Address 2, Street Number, Street Number + Address 1, City, State, Zip, Phone (use type), Phone Rank 1, Phone Rank 2, Mail Parent Name, YOG, Original YOG, Gender (M/F), SASID, LASID, DOB (mm/dd/yy), DOB (mm/dd/yyyy), District Name, School Name, School Code, Counselor, Count, Ethnicity, Ethnicity State Code, Lunch Type, English Proficiency, English Proficiency State Code, Shop, Shop Cip #, Special Needs, Sped Status, Sped Status State Code, Primary Language, Primary Language State Code, Town, Occupational Ed Status, Occupational Ed Status State Code, Email, Sped Liaison, Educationally Disadvantaged, Soc Security#, Title I, Name Suffix, Previous School Name, Previous School Year, Low Income Status, Entry/Withdrawal Date, Last Middle First Name.
Selection Criteria: Student ID, Enrollment Start Date, Enrollment End Date, School, Grade Level, Homeroom, Special Needs, Which Address, Which Phone Type, Label Style and Include Incoming.
Sorting: Name, Grade Level, Homeroom
Sample Output:
RTF

<Free/Reduced Lunch> Report
The Free and Reduced Lunch report is used to make a list of students and their Free or Reduced Lunch Status. This report indicates the Student ID, Name, Gender, Grade, Homeroom and Lunch Status.
Selection Criteria: Lunch Type, Grade Level, and Homeroom.
Sorting: Name, Grade Level/Name, Homeroom/Name, and Lunch Type/Name.
Sample Output:
ID Name Gender Grade Homeroom Lunch
2212 Abbott, Jane F 12 2210 N/A
2178 Adams, Jennifer F 11 1203 N/A
1206 Adams, William F 12 GYMA N/A
1587 Ahearn, Christopher M 10 2210 N/A
2322 Ahnfeldt, Amanda F 10 2210 Free Lunch
<Gov’t Test> Report
The Gov’t Test report is used to make a list of student’s standardized test scores that are located on the Gov’t Test tab. This report indicates the Name, Student ID, Year of Graduation, Homeroom and test scores.
Selection Criteria: Test Type, From Date, To Date, Student ID, Grade Level, Homeroom, Enrollment Status.
Sorting: Name, Grade, Homeroom.
Sample Output:

<HR Assignment by GL> Report
The Homeroom Assignment by Grade Level report is used to make a list of homerooms and indicate the number of Males, Females and the total number of students assigned to that homeroom.
Selection Criteria: Calendar Year, Grade Level, Homeroom, Enrollment Status, Counselor, Shop Code, Males Only, Females Only and Special Needs.
Sorting: None
Sample Output:
Year: 2001-2002
Grade Level:
Homeroom:
Enroll Status: Enrolled
Counselor:
Shop Code:
Male Only: No
Female Only No
Special Needs No
Room Teacher GL Students M F Total
B3455 Mr. Smith 10 Aiello - Aiello 1 0 1
1 0 1
1203 Mrs. D'Amour 11 Adams - Adams 0 1 1
AG24 Mr. Bonaventura 11 Albertson - Albertson 1 0 1
1 1 2
H565 Mrs. Mellow 12 Adams - Adams 0 1 1
0 1 1
2 2 4
Female: 2
Male: 2
Total: 4
<HR Assignment Report> Report
The (HR) Homeroom Assignment report is used to make a list of students their Grade Level, Gender and Homeroom.
Selection Criteria: Calendar Year, Grade Level, Homeroom, Enrollment Status, Counselor, Shop Code, Males Only, Females Only and Special Needs.
Sorting: Name, Grade Level, Homeroom, or Gender
Sample Output:
Year: 2001-2002
Grade Level:
Homeroom:
Enroll Status: Enrolled
Counselor:
Shop Code:
Sort By: Name
Male Only: No
Female Only No
Special Needs No
2178 Adams, Jennifer 11 Female 1203
1206 Adams, William 12 Female GYMA
1587 Ahearn, Christopher 10 Male 2210
2322 Ahnfeldt, Amanda 10 Female 2210
2323 Ahnfeldt, Paul 12 Male 1207
<HR List> Report
The (HR) Homeroom List report is used to make a Homeroom list of students their Grade Level, Gender and Homeroom. A line divider can also be added to this report.
Selection Criteria: Grade Level, Homeroom and Enrollment Status.
Sorting: Name, Grade Level or Gender
Sample Output:
ID Name Grade Gender Homeroom
2178 Adams, Jennifer 11 Female 1203
1279 Aiello, Jamie 11 Female 1203
1135 Allia, Zachary 11 Male 1203
1392 Alto, Ryan 11 Male 1203
1079 Amero, Tiffany 11 Female 1203
Female: 11
Male: 14
Total: 25
<Immigrants/Migrant> Report
The Immigrant/Migrant report is used to list students with their Gender, Grade Level, Homeroom, Immigrant Status, Country Of Origin and Migrant Status.
Selection Criteria: Grade Level, Homeroom, Enrollment Status, Counselor, Shop Code, Immigrant/Migrant Status Gender and Special Needs.
Sorting: Name, Grade, Homeroom, Shop Code, Counselor, Immigrant and Migrant Status.
Sample Output:
ID Name Sex Grade Homeroom Immigrant Country Of Origin Migrant
2212 Abbott, Jane F 12 2210 YES AD Andorra No
2178 Adams, Jennifer F 11 1203 No No
1206 Adams, William F 12 GYMA No No
1587 Ahearn, Christopher M 10 2210 No No
2322 Ahnfeldt, Amanda F 10 2210 No No
<Limited English Proficiency> Report
The Limited English Proficiency report is used to list students and their Grade Level, Gender, Homeroom, Ethnicity, English Proficiency, Primary Language, Bilingual Education status, and Special Education Status. Line separators can be added to this report.
Selection Criteria: Grade Level, Homeroom, Enrollment Status, Counselor, Shop Code, Special Needs and Limited English Proficiency Only.
Sorting: Name, Grade, Homeroom and Gender.
Sample Output:
ID Name Grade Gender Homeroom Ethnic EngProf Lang Bil-Ed Sped
1206 Adams, William 12 Female GYMA WHT 01 267 01 00
2258 Caetano, Eduardo 12 Male 1209 HSPN 01 006 04 00
2259 Caetano, Lorena 10 Female 2212 HSPN 01 006 04 00
2091 Castro, Mychell 10 Male 2212 HSPN 01 006 04 00
2285 Costa, Keila 11 Female WWDN HSPN 01 267 00 00
Female: 10
Male: 7
Total: 17
<Middle Name> Report
The Middle Name report is used to list student’s First Name, Middle Name, Last Name, Gender, Grade Level, and Homeroom.
Selection Criteria: Grade Level, Homeroom, Enrollment Status, Counselor, Shop Code, Male Only, female Only and Special Needs.
Sorting: Name, Grade Level, Homeroom, Shop Code, Counselor, Gender, Town, or School
Sample Output:
ID First Name Middle Name Last Name Gender Grade Home Room
2212 Jane NMN Abbott Female 12 2210
2178 Jennifer Michelle Adams Female 11 1203
1206 William NMN Adams Female 12 GYMA
1587 Christopher Michael Ahearn Male 10 2210
2322 Amanda Leigh Ahnfeldt Female 10 2210
<Miscellaneous> Report
The Miscellaneous report is used to report data that is kept in the Miscellaneous Fields in the Biographical System.
Selection Criteria: Last Name, Homeroom, Grade Level and each miscellaneous field.
Sorting: None

Sample Output:
<Previous School> Report
The Previous School report is used to list a student’s Grade Level, Gender, School Year and pervious school.
Selection Criteria: Previous School or Grade Level.
Sorting: Student Name, Previous School, Previous School Year or Grade Level.
Sample Output:
ID Name GL M/F Year Previous School
2405 Adams, Hannah 08 F 2000-2001 Nashua High School
2178 Adams, Jennifer 11 F 1997-1998 i-PASS Middle School
<Primary School> Report
The Primary School report is used to list students and their Primary School, Gender, Grade Level, Homeroom and Counselor.
Selection Criteria: Primary School Calendar Year Grade Level and Homeroom.
Sorting: Primary School, Student Name, Grade Level or Homeroom.
Sample Output:
ID Name School Sex Grade Homeroom Counselor
2212 Abbott, Jane iPASS Testing High School F 2210 Ms. Healey
2178 Adams, Jennifer iPASS Testing High School F 10 1203
1206 Adams, William iPASS Testing High School F GYMA Ms. Healey
<SASID/LASID> Report
The SASID/LASID report is used to list students and their Gender, Grade Level, Homeroom, LASID and SASID.
Selection Criteria: Grade Level, Homeroom, Shop Code and Special Needs.
Sorting: Name, Grade Level, Homeroom, Lasid or Sasid.
Sample Output:
ID Name Gender Grade Hr. LASID SASID
1901 Poole, Aaron Male 12 1217 5050000986 1089027999
1394 Peckham, Aaron Male 11 2215 3050000261 1067026999
2007 Salzman, Aaron Male 12 1218 5050001018 1049121999
1746 Natti, Aaron Male 09 GYMA 3050000560 1030528999
<SPED/Tech Services> Report
The Special Education and Technical Education report is used to list students and their Town/Zip, Grade Level, Gender, Ethnicity, Technical Education Status, Liaison and SPED Prototype.
Selection Criteria: Grade Level, Homeroom, Enrollment Status, Counselor, Shop Code, Town Code, Gender and Special Needs.
Sorting: Name, Counselor, Grade, Gender, Homeroom, Prototype, Town Code, or Zip Code.
Sample Output:
ID Name Hr Town/Zip Grade Gender Ethnic TechEd Liaison ProtoType
2212 Abbott, Jane 2210 100 12 F NA CA Mr. Jones 502.4
2178 Adams, Jennifer 1203 014 11 F WHT N/A Mr. Jones 00
1206 Adams, William GYMA 100 12 F WHT CA Mr. Jones 00
<eSPED Export> Report
The eSPED Export is used to export student biographical information in a format that can be used to update the information in eSPED. This can also be used with other programs beside eSPED.
Selection Criteria: Grade Level, Homeroom.
Sorting: Name/Grade Level, Grade Level/Name, Homeroom/Name, Town/Grade Level/Name, Zip Code.
Sample Output:
Local ID,"First Name","Middle Name","Last Name","Address","City","State","ZIP","Preferred Name","Sex","State Id","Grade","Ethnic","DOB","Primary Disability","Economic Status","Language Primary","Language (parent)","Language Secondary","School","School Year","Medicaid Number","Meeting Start Date","Meeting End Date","prototype","Guardian 1 NAME","Guardian 1 Relation","Guardian 1 Phone 1","Guardian 1 Phone 2","Guardian 1 Address","Guardian 1 City State ZIP","Guardian 2 NAME","Guardian 2 Relation","Guardian 2 Phone 1","Guardian 2 Phone 2","Guardian 2 Address","Guardian 2 City State Zip","Guardian 3 NAME","Guardian 3 Relation","Guardian 3 Phone 1","Guardian 3 Phone 2","Guardian 3 Address","Guardian 3 City State ZIP","Guardian 4 NAME","Guardian 4 Relation","Guardian 4 Phone 1","Guardian 4 Phone 2","Guardian 4 Address","Guardian 4 City State Zip","Guardian 5 NAME","Guardian 5 Relation","Guardian 5 Phone 1","Guardian 5 Phone 2","Guardian 5 Address","Guardian 5 City State ZIP"
<Student Directory> Report
The Student Directory report is used to list students and their Parent Name, Address, Phone Numbers, Year of Graduation, Grade Level, Gender, Date of Birth, Homeroom, Homeroom Teacher, Student ID and Bus information.
Selection Criteria: Enrollment Status, Incoming Only, Grade Level, Homeroom and Town.
Sorting: Name/Grade Level, Grade Level/Name, Home Room/Name, Town/Grade Level/Name, and Zip Code.
Page Break by: Grade Level, Homeroom, Town or Zip Code.
Sample Output:
Abbott, Jane 2002 12 F DOB:04/16/1986 HR: 2210 Ms. Delaney 2212
Pamela Abbott HOME PHO000-000-5120 Buses: Mon Tue Wed Thu Fri
450 Franklin Street Home #2 000-000-5121 To School:
Framingham, MA 01702- To Home:
Adams, Jennifer 2003 11 F DOB:04/15/1985 HR: 1203 Mrs. D'Amour 2178
Tammy Adams 000-000-3940 Buses: Mon Tue Wed Thu Fri
4198 Revere Street 000-000-3941 To School:
Gloucester, CA 98758- HOME PHO000-002-7461 To Home:
<Student Enrollment> Report
The Student Enrollment report is used to list students and their Enrollment Status, Grade Level, Year of Graduation, Original Year of Graduation, Gender and Homeroom.
Selection Criteria: Academic Year, Enrollment Status, Grade Level, Homeroom and Year of Graduation.
Sorting: Enrollment Status, Grade Level/Name, Name, Homeroom/Name, Name/YOG, or Name/Original YOG
Sample Output:
ID Name Enroll Status Grade YOG OriginalYog Gender HR
2212 Abbott, Jane Enrolled 12 2002 2004 Female 2210
2178 Adams, Jennifer Enrolled 11 2003 2003 Female 1203
1206 Adams, William Enrolled 12 2002 2002 Female GYMA
1587 Ahearn, Christopher Enrolled 10 2004 2004 Male 2210
2322 Ahnfeldt, Amanda Enrolled 10 2004 2004 Female 2210
2323 Ahnfeldt, Paul Enrolled 12 2002 2002 Male 1207
<Bio Verification> Report
The Bio Verification Report is used to list student information that is current in the database to be sent home to parents for corrections and verification.
Selection Criteria: Academic Year, Form (Lists all PCL forms that are saved as Data Sheets) Student ID, Last Name, Homeroom, Grade Level, Counselor, Output Device (Lists all Printers that are assign in <Administration><School Recourses><School Profile> for each school.
Sorting: Name (First/Last), Grade Level or Homeroom
Output contains the following:
ID#
First Name:
Last Name:
YOG/Grade:
Gender:
Bus #
Full Middle Name:
School:
Homeroom:
Birth Date:
City of Birth:
Home Phone #:
Student's Social Security Number:
Student's Email Address:
Primary Language spoken at home:
Is the student's Ethnicity Hispanic or Latino?
Student's Race:
Resident Address: Mailing Address: < Guardian/Contact Data > 1st Contact: Relationship: Lives with student: Legal Status: Receives Mail: Email Address: Can Dismiss the student? Workplace: Can Receive the student? Phone # Type Extension
<Free/Reduced Lunch> Report
The Free and Reduced Lunch Report is used to list students and their Student ID, Name, Gender, Homeroom and Lunch Type.
Selection Criteria: Lunch Type, Grade Level, or Homeroom
Sorting: Name, Grade Level/Name, Homeroom/Name or Lunch Type/Name
Sample Output:
ID Name Gender Grade Homeroom Lunch
10027 a'dams, Joseph M 09 1205 N/A
1831 ABaxter, Cambridge F 10 1222 N/A
3199 Adams , Jennifer F 12 1205 Not Eligible
1799 Adams, Joseph M 10 1303 N/A
1169 Albertson, David M 12 1303 N/A
<Phone List> Report
The Phone List report is used to list students and their Student ID, Homeroom, YOG, Gender, Each Guardian listed for the student with phone numbers that match the Phone Type selected in <Biographical System><Maintenance-Biographical><Phone List Parameters>.
Selection Criteria: Academic Year, Student ID, Grade Level, Homeroom, Show Student’s Phones? YES/NO, Code set. (Code Set is set up in <Biographical System><Maintenance-Biographical><Phone List Parameters>)
Sorting: Name, Homeroom, YOG Gender
Sample Output:
|
3199 |
Adams , Jennifer |
HR: 1205 |
YOG: 2008 |
Gender: F |
|
|
Griffin, Tech Ed Mother |
444-444-4444 HOME PHONE |
|
|
|
|
|
555-555-5555 Work |
|
|
|
|
Adams, JamesW Father |
111-111-1111Father's Work # |
|
|
|
|
|
222-222-2222 HOME PHONE |
|
|
|
|
|
|
|
|
Primary School Year
Primary School Year is used to modify a student’s Primary School Record. Primary School Records must be correct so that students will be linked to their school for Search Filters, Reports, Attendance, Scheduling and other i PASS systems. Primary School Records are automatically created when a student is first registered into your district. Each year when the primary School is entered on the Student’s Profile page a new record is added. Each time a Primary School is changed on the student’s profile page the record is modified.
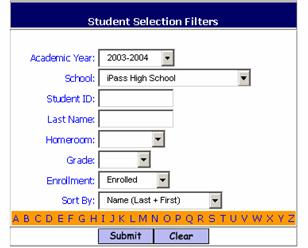
Figure 24
Academic Year:
Þ Select the Academic Year you wish to search on.
School:
Þ Select the School you wish to search in.
Student ID:
Þ Select a Student ID or a list of Student IDs separated by a comma.
Last Name:
Þ Select the Last Name you wish to search on.
Homeroom:
Þ Select the Homeroom you wish to search on.
Grade:
Þ Select the Grade Level you wish to search on.
Enrollment:
Þ Select the Enrollment Status you wish to search on.
Sort By:
Þ Select Name (Last + First), Student ID, Grade Level, or Homeroom.
Clear:
Þ This will clear all the search fields.
Þ
Click ![]() to submit the search selections.
to submit the search selections.

Figure 25
Click on a student’s ID to see their Primary School records.
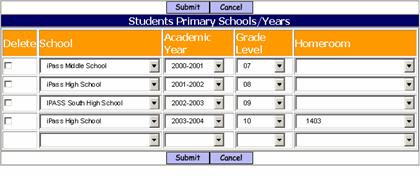
Figure 26
Delete:
Þ Check this box if you want to delete the corresponding record.
School:
Þ Select the school that corresponds with the Academic year displayed.
Academic Year:
Þ Each Academic year the student has been in your district should be displayed.
Grade Level:
Þ Select the grade level that corresponds with the Academic year displayed.
Homeroom:
Þ Select the Homeroom that corresponds with the Academic year displayed.
Þ
Click ![]() to submit any changes you make
to submit any changes you make
Þ
Click ![]() to leave this
screen and make no changes
to leave this
screen and make no changes
To Delete a Primary School Record
Þ Click the box next to delete to add a check mark to the box.
Þ
Click the ![]() button
at the bottom of the page
button
at the bottom of the page
Biographical Maintenance
<Assign Photos to IDs> Tab
This screen allows you the ability to Import Student Photos from the CD provided from the Photographer.
Þ First you must copy the file from the CD to the iPASS server and into a folder named /appl/school/images/students
Grade Levels:
Þ Select the Grade Levels of the students you wish to import photos for.
Override if Exists:
Þ Select YES or NO.
File Prefix:
Þ Select the file prefix for the file you are importing.
File Extension:
Þ Select the file extension for the file you are importing.
Submit:
Þ
Click the ![]() button
to submit additions or changes to the table.
button
to submit additions or changes to the table.
<DOE Specific> Tabs
Each of the DOE data Elements that need drop down menus will have a
corresponding Tab. These Tabs are used to add and modify the codes used in the
drop down menus.
<Migrant Codes> Tab
<Title 1> Tab
<Post Graduate Plans> Tab
<SPED Status> Tab
<SPED Private Placement> Tab
<Compensatory Education> Tab
<Enrollment
Reason> Tab
<Enrollment
Status Codes> Tab
<Career & Technical Program> Tab
<Limited English Proficiency> Tab
<Ethnic Codes> Tab
<Immigrant Codes> Tab
<Language Codes> Tab
<Low Income> Tab
<English Language Learner Program> Tab
<Reporting Reasons> Tab
Delete:
Þ Check this box to delete an item.
Code:
Þ Create an Alphanumeric code for each item.
Description:
Þ Enter a description for each item.
State:
Þ This is the code that will be sent to the DOE in the Data Transmissions.
Clear All and Check All:
Þ Use these options to check all delete boxes or Clear all checks form the delete boxes.
Prev and Next:
Þ Use these options to move to the Next Screen for this table or move to the Previous screen for this table.
Submit:
Þ
Click the ![]() button
to submit additions or changes to the table.
button
to submit additions or changes to the table.
<Country Codes>Tab
Delete:
Þ Check this box to delete an item.
Code:
Þ Create an Alphanumeric code for each item.
Description:
Þ Enter a description for each item.
Clear All and Check All:
Þ Use these options to check all delete boxes or Clear all checks form the delete boxes.
Prev and Next:
Þ Use these options to move to the Next Screen for this table or move to the Previous screen for this table.
Submit:
Þ
Click the ![]() button
to submit additions or changes to the table.
button
to submit additions or changes to the table.
<Entry Withdrawal Codes>Tab
This table is used to create the entry/withdrawal codes used on the enrollment records.
Delete:
Þ Check this box to delete an item.
Code:
Þ Create an Alphanumeric code for each item.
Description:
Þ Enter a description for each item.
Enrollment Status:
Þ Enter the corresponding Enrollment Status for each item.
Clear All and Check All:
Þ Use these options to check all delete boxes or Clear all checks form the delete boxes.
Prev and Next:
Þ Use these options to move to the Next Screen for this table or move to the Previous screen for this table.
Submit:
Þ
Click the ![]() button
to submit additions or changes to the table.
button
to submit additions or changes to the table.
<Enroll Status> Tab
This table is needed for the Enrollment Status information on the <Entry/Withdrawal Codes>Tab.
Delete:
Þ Check this box to delete an item.
Enroll Status:
Þ Create an Alphanumeric code for each item.
Description:
Þ Enter a description for each item.
Clear All and Check All:
Þ Use these options to check all delete boxes or Clear all checks form the delete boxes.
Prev and Next:
Þ Use these options to move to the Next Screen for this table or move to the Previous screen for this table.
Submit:
Þ
Click the ![]() button
to submit additions or changes to the table.
button
to submit additions or changes to the table.
<Tech Ed (Shop Codes) > Tab
This table is used for the Shop Code field on the <Career and Tech Ed> Tab.
Delete:
Þ Check this box to delete an item.
Tech Ed Code:
Þ Enter the Tech Ed Code for each item.
Description:
Þ Enter a description for each item.
Chapter 74:
Þ Select YES or NO for each item.
Cip No:
Þ Enter the Cip code for each item.
Non Trade Type:
Þ Enter the Non Trade Type for each item.
Sec Tech Voc:
Þ Select YES or NO for each item.
Clear All and Check All:
Þ Use these options to check all delete boxes or Clear all checks form the delete boxes.
Prev and Next:
Þ Use these options to move to the Next Screen for this table or move to the Previous screen for this table.
Submit:
Þ
Click the ![]() button
to submit additions or changes to the table.
button
to submit additions or changes to the table.
<Lunch Types> Tab
This table is used for the Free Lunch field on the <Confidential> Tab.
Delete:
Þ Check this box to delete an item.
Lunch Description:
Þ Enter a description for each item.
State Code:
Þ Enter a state code for each item.
Clear All and Check All:
Þ Use these options to check all delete boxes or Clear all checks form the delete boxes.
Prev and Next:
Þ Use these options to move to the Next Screen for this table or move to the Previous screen for this table.
Submit:
Þ
Click the ![]() button
to submit additions or changes to the table.
button
to submit additions or changes to the table.
<Phone List Parameters> Tab
This table is used for the <Phone List> Report.
Group:
Þ Name the group.
Phone Types:
Þ Multi select the phone types you want included in the Phone List Report.
Relationships:
Þ Multi select the relationships you want included in the Phone List Report.
Submit:
Þ
Click the ![]() button
to submit additions or changes to the table.
button
to submit additions or changes to the table.
<Government Test Maintenance>Tab
This Tab is used to create Attributes for the Government Test you wish to maintain.

Figure 27
Þ
Click ![]() to enter a new set of Test
Attributes
to enter a new set of Test
Attributes
Figure 28
Name:
Þ Enter the Name of the Test.
Description:
Þ Enter the Description of the Test.
Code:
Þ Enter the Code for the Test.
Display Order:
Þ Enter the Display Order for the Test.
Print on Transcript:
Þ Click on Yes/No to indicate if the field should be printed on the transcript.
Test Attribute Code:
Þ Enter the Code for the Attribute.
Test Attribute description:
Þ Enter the Description of the Attribute.
Test Attribute Display Order:
Þ Enter the Display Order for the Attribute.
Þ
Click ![]() to submit any changes you make
to submit any changes you make
Þ
Click ![]() to leave this
screen and make no changes
to leave this
screen and make no changes
<Import Test Scores>Tab
This Tab is used to Import Test Scores into the database to be displayed on the Government Test Score Tab under <Biographical System><Add Modify Student Biographical><Government Test>
Figure 29
Upload:
Þ You must upload the file to a Temp Directory first.

Figure 30
Browse:
Þ Click the Browse button to locate the file.
Þ The file name will then be visible in the File Box.
Þ
Click the ![]() button to
load the file
button to
load the file
Select a Test:
Þ Select a test that corresponds to the data in the file.
File Name:
Þ The file name must be entered exactly how it was displayed when uploaded. This is case sensitive.
File Type:
Þ Select the type of file you uploaded.
Delimiter:
Þ Select the delimiter that is used in the file you uploaded.
Encapsulator:
Þ Select the Encapsulator used in the file you uploaded.
Test Date:
Þ Use this field only if the Test date is not in each student’s record in the file you uploaded.
Grade Level:
Þ Use this field only if the Grade Level is not in each student’s record in the file you uploaded.
Overwrite Values:
Þ Select Yes/No to overwrite the data.
Click on ![]() to see a
sample of the data in the file and to link the data fields in the file to the
Test Attribute fields
to see a
sample of the data in the file and to link the data fields in the file to the
Test Attribute fields

Figure 31
Use the box to assign the attribute that corresponds with the data
Þ
Click the ![]() This will
import your test scores
This will
import your test scores
<Language Codes>Tab
Delete:
Þ Check this box to delete a item.
Code:
Þ Create an Alphanumeric code for each item.
Description:
Þ Enter a description for each item.
Clear All and Check All:
Þ Use these options to check all delete boxes or Clear all checks form the delete boxes.
Prev and Next:
Þ Use these options to move to the Next Screen for this table or move to the Previous screen for this table.
Submit:
Þ
Click the ![]() button
to submit additions or changes to the table.
button
to submit additions or changes to the table.
<SPED Services>Tab
This table is used in the Delete Special Services portion of the <Confidential> Tab.
Delete:
Þ Check this box to delete an item.
Service:
Þ Enter the name of a service.
Service Value:
Þ Enter a service value.
Clear All and Check All:
Þ Use these options to check all delete boxes or Clear all checks form the delete boxes.
Prev and Next:
Þ Use these options to move to the Next Screen for this table or move to the Previous screen for this table.
Submit:
Þ
Click the ![]() button
to submit additions or changes to the table.
button
to submit additions or changes to the table.
<Town Codes>Tab
This table is used to create Town of Residence Codes when entering the Town name.
Delete:
Þ Check this box to delete a item.
Code:
Þ Create an Alphanumeric code for each item.
City:
Þ Enter the City Name.
State:
Þ Enter the State Name.
Zip:
Þ Enter the Zip Code.
State Town Code:
Þ This is the code that will be sent to the DOE in the Data Transmissions.
Clear All and Check All:
Þ Use these options to check all delete boxes or Clear all checks form the delete boxes.
Prev and Next:
Þ Use these options to move to the Next Screen for this table or move to the Previous screen for this table.
Submit:
Þ
Click the ![]() button
to submit additions or changes to the table.
button
to submit additions or changes to the table.
<User Defined>Tab
User defined fields are used to store information that is not maintained anywhere else in the database. You can create as many User Defined fields as you need.
Figure 32
Þ
Click ![]() to create a new User Defined
Field
to create a new User Defined
Field

Figure 33
Table Name:
Þ Select Student for Table Name.
Name:
Þ Enter the Name of the Field.
Display Order:
Þ Enter a display order for this Field.
Print on Transcript:
Þ Click on Yes/No to indicate if the field should be printed on the transcript.
Field Size:
Þ Enter the Field Size minimum.
Max Field Size:
Þ Enter the Field Size maximum.
Type:
Þ Select Text or Selection List.
Values:
Þ Enter the values you want to have in the selection list separated by a comma.
Þ
Click ![]() to create to save
the changes to the record
to create to save
the changes to the record
Þ
Click ![]() to return to the
last screen without saving the changes to this screen
to return to the
last screen without saving the changes to this screen
Þ
Click ![]() to
delete the User Defined Field
to
delete the User Defined Field
Close Window